Tesla Model S: Headlining - Panoramic Roof (Remove and Replace)
Tesla Model S (2012-2026) Service Manual / Interior trim / Headlining - Panoramic Roof (Remove and Replace)
Removal
- Remove front windshield (refer to procedure)
- Lower headlining for access (refer to procedure)
- With assistance remove headlining through front windshield opening.
- Remove rear map lamps from headlining.
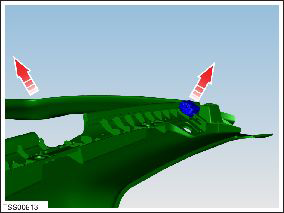
- Release clips (x2) securing overhead console to headlining.
- Remove overhead console.
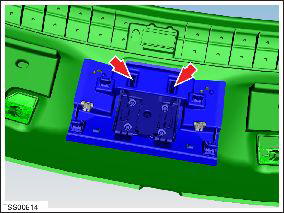
- Remove screws (x2) securing front map lamps to headlining.
- Remove front lamp holder assembly.

Installation procedure is the reverse of removal.
READ NEXT:
 Underhood Storage Unit (RWD) (Remove and Install)
Removal
Remove the underhood storage extension box (refer to procedure).
Remove the rear underhood apron (refer to procedure).
Remove the front underhood apron (refer to procedure
Underhood Storage Unit (Dual Motor) (Remove and Replace)
Removal
Remove the underhood aprons.
Peel back the carpeting at the rear of the underhood storage
unit. Release the bolts (x2) (torque 8 Nm).
Assembly - Hood Latch Cover (Remove and Replace)
Removal
Open the hood for access.
Remove the lower carpet from the underhood storage area.
Gently lift up on the hood s
SEE MORE:
Unable to charge with Mobile Connector
Inadequate outlet grounding - Try another outlet
The Mobile Connector has detected that the electrical outlet has insufficient grounding, likely caused by an
inadequate or missing ground connection. This does not indicate an issue with
your Mobile Connector or vehicle, but
instead points to an is
Data Sharing
For quality assurance and to support the continuous
improvement of advanced features such as Autopilot,
your Model S may collect analytics, road segment,
diagnostic, and vehicle usage data and send to Tesla for
analysis. This analysis helps Tesla improve products and
services by learning from t
© 2019-2026 Copyright www.tesms.org
