Tesla Model S: Underhood Storage Unit (Dual Motor) (Remove and Replace)
Tesla Model S (2012-2026) Service Manual / Interior trim / Underhood Storage Unit (Dual Motor) (Remove and Replace)
Removal
- Remove the underhood aprons.
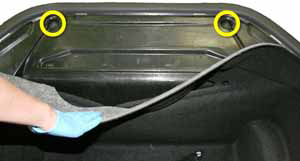
- Peel back the carpeting at the rear of the underhood storage
unit. Release the bolts (x2) (torque 8 Nm).
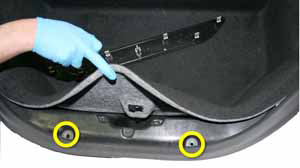
- Peel back the carpeting at the front of the underhood storage
unit. Release the bolts (x2) (torque 4 Nm).
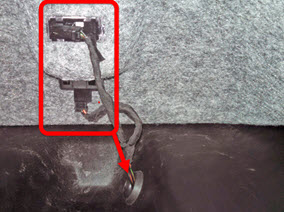
- Disconnect the emergency hood release and front light harnesess,
then push them out through the grommet.
- Remove the underhood storage unit from the vehicle.
Installation procedure is the reverse of removal.
Underhood Storage Extension Box (Remove and Install)
Removal- Remove the underhood storage carpet (refer to procedure).
- Remove the screws that secure the underhood storage extension box to the underhood storage unit.
- Remove the storage extension box.
Installation procedure is the reverse of removal.
READ NEXT:
 Assembly - Hood Latch Cover (Remove and Replace)
Removal
Open the hood for access.
Remove the lower carpet from the underhood storage area.
Gently lift up on the hood s
Trim - Rear Trunk - Side - LH (Remove and Replace)
Removal
Remove the 'C' post rear trim (refer to procedure).
Remove the trunk sill panel.
Remove the trunk side garnish
Trim - Rear Trunk - Side - RH (Remove and Replace)
Removal
Remove the 'C' post rear trim. (refer to procedure)
Remove the trunk side garnish trim.
Remove the trunk floor
SEE MORE:
Starting/Discharging the System
Starting the System
Press the emergency stop button to disable HV systems.
Pull out the display/keyboard/trackpad tray.
Press the red power button to turn on the on-board PC.
Follow the onscreen instructions to log in to the system.
Userna
Standby Mode
To keep Model S ready to Summon and reduce the time
it takes to warm up, turn on Standby Mode. Touch
Controls > Autopilot > Standby Mode. When Standby
Mode is turned on, you can conserve Battery energy by
disabling Standby Mode at these locations:
Exclude Home - Disables Standby Mode at
© 2019-2026 Copyright www.tesms.org
