Tesla Model S: Assembly - Hood Latch Cover (Remove and Replace)
Tesla Model S (2012-2026) Service Manual / Interior trim / Assembly - Hood Latch Cover (Remove and Replace)
Removal
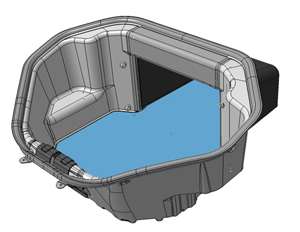
- Open the hood for access.
- Remove the lower carpet from the underhood storage area.
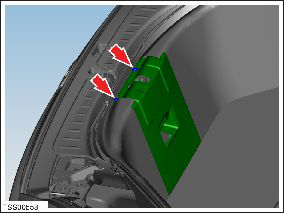
- Gently lift up on the hood seal and remove the push pins (x2)
that secure the hood latch cover to crossmember.
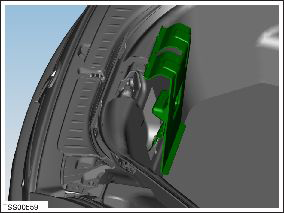
- Carefully release the hood latch cover and disconnect the lamp and hood switch harness connectors.
- Remove the hood latch cover assembly.
- Depress the clips and remove the lamp holder and hood release switch from the trim panel.
Installation procedure is the reverse of removal.
Lamp - Underhood Storage Area (Remove and Replace)
RemovalRemove frunk hood latch cover (refer to procedure) Installation Installation procedure reverse of removal.
READ NEXT:
 Trim - Rear Trunk - Side - LH (Remove and Replace)
Removal
Remove the 'C' post rear trim (refer to procedure).
Remove the trunk sill panel.
Remove the trunk side garnish
Trim - Rear Trunk - Side - RH (Remove and Replace)
Removal
Remove the 'C' post rear trim. (refer to procedure)
Remove the trunk side garnish trim.
Remove the trunk floor
Trim - Rear Trunk - Floor (Remove and Replace)
Removal
Open the rear liftgate for access.
Release the tethers (x2) and clips (x2) that secure the trunk
cover to the body.
Remove the trunk cover.
Release the handle and remo
SEE MORE:
Switch - Window Lift - LH - Rear (Remove and Replace)
Removal
Remove LH rear door panel (refer to procedure)
Move acoustic pad aside to access door trim.
Caution: Take care not to damage component(s).
Remove screws (x3) securing window lift switch surround
Compressor (Dual Motor) (Remove and Replace)
Warning: Only technicians who have been trained in High
Voltage Awareness are permitted to perform this procedure. Proper
personal protective equipment (PPE) and insulating HV gloves with a
minimum rating of class 00 (500V) must be worn any time a high
voltage cable is handled. Refer
© 2019-2026 Copyright www.tesms.org
