Tesla Model S: Underhood Storage Unit (RWD) (Remove and Install)
Tesla Model S (2012-2026) Service Manual / Interior trim / Underhood Storage Unit (RWD) (Remove and Install)
Removal
- Remove the underhood storage extension box (refer to procedure).
- Remove the rear underhood apron (refer to procedure).
- Remove the front underhood apron (refer to procedure).
- Disconnect the fir tree clips (x2) that fasten the hood release cable to the lower left edge of the storage unit.
- Remove the bolts (x4) that secure the sides and rear of the
storage unit (torque 8 Nm).

- Remove the bolts (x2) that secure the storage unit to the front
bumper carrier (torque 6 Nm).
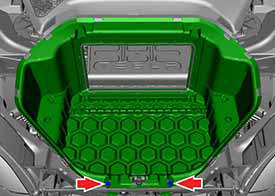
- Remove the storage unit from the vehicle.
Installation procedure is the reverse of removal.
READ NEXT:
 Underhood Storage Unit (Dual Motor) (Remove and Replace)
Removal
Remove the underhood aprons.
Peel back the carpeting at the rear of the underhood storage
unit. Release the bolts (x2) (torque 8 Nm).
Assembly - Hood Latch Cover (Remove and Replace)
Removal
Open the hood for access.
Remove the lower carpet from the underhood storage area.
Gently lift up on the hood s
Trim - Rear Trunk - Side - LH (Remove and Replace)
Removal
Remove the 'C' post rear trim (refer to procedure).
Remove the trunk sill panel.
Remove the trunk side garnish
SEE MORE:
4 Way Coolant Valve - Series/Parallel (Remove and Replace)
Warning: If the vehicle has air suspension, activate "Jack"
mode on the touchscreen before raising and supporting the vehicle.
Warning: If the 12V power supply is
disconnected, do not attempt to open any doors with door glass
in closed position. Failure to follow this instruction c
Brake Pads - Front - Set (Remove and Replace)
Warning: If the
vehicle has air suspension, activate "Jack" mode on the
touchscreen before raising and supporting the vehicle.
Special tool required for this procedure:
Supplier
Part Number
© 2019-2026 Copyright www.tesms.org
