Tesla Model S: Headliner - Panoramic Roof (Remove and Install)
Tesla Model S (2012-2026) Service Manual / Interior trim / Headliner - Panoramic Roof (Remove and Install)
Note: This procedure does not remove the headliner from vehicle; the headliner remains inside the vehicle cabin supported by the tops of the seats. Removal
- Remove the LH A-pillar trim (refer to procedure).
- Remove the RH A-pillar trim.
- Release the LH upper B-pillar trim (refer to procedure).
- Release the RH upper B-pillar trim.
- Remove the LH C-pillar trim (refer to procedure).
- Remove the RH C-pillar trim.
- Remove the driver's sun visor (refer to procedure).
- Remove the passenger's sun visor.
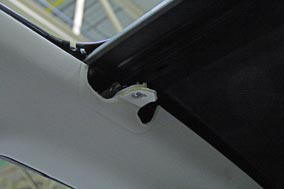
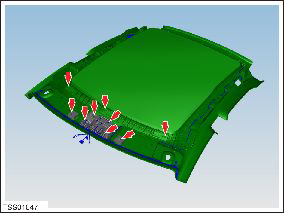
- Carefully release the clips (x4) that secure the headliner
center trim to the cross rail.
Caution: Take care not to damage component(s).
Caution: Replace any broken clips.
- 2nd generation panoramic roof only: Remove the fasteners (x3) that secure the metal bar to the roof frame.
- Remove the screws (x2) that secure the headliner to the roof
frame or the metal bar, as applicable.
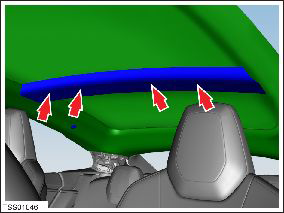
- Release the rear header clips (x5).
- Pull down on the rear of the rear view mirror trim to release the trim.
- Carefully release the clips (x4) that secure the headliner to
the front header.
Note: Components have been removed in this graphic to aid clarity.
- Lower the headliner onto the seats. Caution: Do not bend or crease the headliner during removal.
Installation procedure is the reverse of removal. Note: The windshield must be removed for access if the headliner is being replaced.
READ NEXT:
 Headlining - Panoramic Roof (Remove and Replace)
Removal
Remove front windshield (refer to procedure)
Lower headlining for access (refer to procedure)
With assistance remove headlining through front windshield
opening.
Remov
Underhood Storage Unit (RWD) (Remove and Install)
Removal
Remove the underhood storage extension box (refer to procedure).
Remove the rear underhood apron (refer to procedure).
Remove the front underhood apron (refer to procedure
Underhood Storage Unit (Dual Motor) (Remove and Replace)
Removal
Remove the underhood aprons.
Peel back the carpeting at the rear of the underhood storage
unit. Release the bolts (x2) (torque 8 Nm).
SEE MORE:
Module - Door Controller (Remove and Replace)
Removal
Remove the door trim cover (refer to procedure)
Disconnect the door module harness connectors (x3).
Remove the screws (x3) that secure the control module to the
door panel (torque 2 Nm).
Remove the door controller module.
Exterior Release Switch - Liftgate (Remove and Replace)
Removal
Open the liftgate to a suitable working height.
Remove the applique from the liftgate (refer to procedure).
Caution: Take care not to damage component(s).
Caution: Protect paintwork from possible damage during
this procedure.
© 2019-2026 Copyright www.tesms.org
