Tesla Model S: Heater - PTC (Dual Motor) (RHD) (Remove and Replace)
Warning: Only technicians who have been trained in High Voltage Awareness are permitted to perform this procedure. Proper personal protective equipment (PPE) and insulating HV gloves with a minimum rating of class 00 (500V) must be worn any time a high voltage cable is handled. Refer to Tech Note TN-15-92-003, "High Voltage Awareness Care Points" for additional safety information.
Warning: If the 12V power supply is disconnected, do not attempt to open any doors with door glass in closed position. Failure to follow this instruction could result in door glass shatter.
Note: Before disconnecting the 12V power supply, ensure that the driver's door window is fully open. Failure to follow this instruction could result in vehicle lockout.
Removal
- Open the glove box.
- Perform the vehicle electrical isolation procedure (refer to procedure).
- Remove the cowl screen panel (refer to procedure).
- Remove and discard the cable tie that secures the PTC heater
harness to the bulkhead.
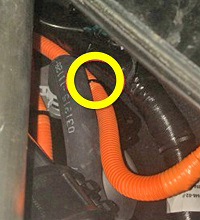
- Release the PTC heater harness (#4 in the below image) from the
top of the forward junction box (FJB).
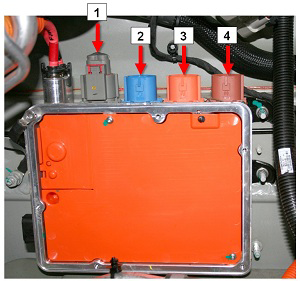
1 HV Battery heater harness 2 DC-DC converter harness 3 Compressor harness 4 PTC heater harness - Push the connector, harness, and grommet through the bulkhead.
- Remove the glove box (refer to procedure).
- Remove the LH footwell cover (refer to procedure).
- If equipped, remove the passenger knee airbag (refer to procedure).
- If equipped, remove the bolts (x2) and screws (x3) that secure the passenger knee airbag bracket. Remove the airbag mounting bracket.
- Remove the screws (x2) that secure the RH HVAC duct.
- Remove the screws (x3) that secure the PTC heater to the HVAC
casing (torque 1 Nm).

- Release the PTC heater harness from the HVAC retaining clip.
- Disconnect the connector from the PTC heater.
- Carefully pull the PTC harness through the bulkhead.
- Carefully remove the PTC heater module from the HVAC casing.
Caution: Take care not to damage component(s).
InstallationInstallation procedure is the reverse of removal, except for the following:
- Clean the interior of HVAC casing prior to assembly.
- Replace the cable tie that secures the PTC heater harness to the bulkhead.
-
Use Toolbox to update or redeploy the firmware:
- If the vehicle is not running the latest firmware, run the "Vehicle Firmware Update" procedure.
- If the vehicle is running the latest firmware, run the "Firmware Redeploy" procedure.
READ NEXT:
 Set Up HVAC Machine
Warning: Servicing must only be performed by personnel
familiar with both vehicle systems and the charging and testing
equipment. Always read and understand the HVAC machine operator's
man
Recover Refrigerant and Verify Charge
Note: Before beginning this section,
complete the "Set Up HVAC Machine" section.
Connect a laptop with Toolbox to the vehicle.
Remove the rear underhood apron (refer to procedure).
SEE MORE:
Latch - Seat Back - 2nd Row Seat - LH (Remove and Replace)
Removal
Remove LH pivot lock (refer to procedure)
Release and remove latch cover from seat back.
Carefully release cover from seat back frame.
Remove bolts (x2) securing latch to seat frame (torque 24 Nm).
R
Actuator - Latch - Hood - LH (Dual Motor) (Remove and Replace)
Removal
Remove the ankle catcher (refer to procedure).
Remove the LH and RH condenser ducts (refer to procedure).
Remove the plastic rivets (x3) that secure the center louver
assembly.
Note: The following image shows the center
louver assembly from the rear.
