Tesla Model S: Hose - Front HVAC - Drain (Dual Motor) (Remove and Replace)
Tesla Model S (2012-2026) Service Manual / Thermal Management / Hose - Front HVAC - Drain (Dual Motor) (Remove and Replace)
Remove
- Perform the electrical isolation procedure (refer to procedure).
- Remove the RH steering brace:
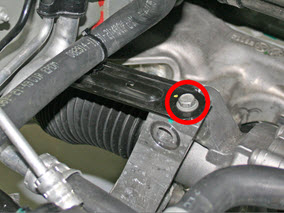
- Remove the bolt that secures the steering brace to
the subframe (torque 26 Nm).
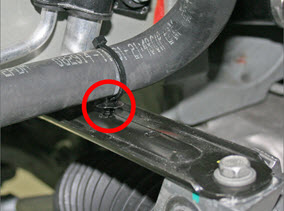
- On the RH side of the vehicle, release the fir tree
clip that secures the coolant hose to the steering
brace.
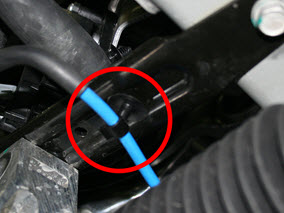
- On the RH side of the vehicle, loosen the bolt that
secures the steering brace to the base of the side rail
(torque 26 Nm), then remove the brace.
Note: Do not remove the bolt.

-
Note: This step is for air suspension
vehicles only.
On the LH side of the vehicle, release the clip that
secures the air suspension line to the steering brace.
- Remove the bolt that secures the steering brace to
the subframe (torque 26 Nm).
- Release the 2 bolts that secure each fuse box to the front crossmember (torque 5 Nm). Move both fuse boxes behind the front crossmember.
- Release the fasteners that secure the air suspension reservoir (torque 2.5 Nm), then set the reservoir aside.
- Release the 2 harnesses on the RH side of the DCDC converter.

- Remove the RH closeout panel (refer to procedure).
- Place a rag underneath the hose to catch any water that is spilled in a later step.
- Spray silicone onto the drain hose to ease removal.
- Working inside the vehicle, gently twist and pull on the hose to release it from the HVAC unit.
- Working in the underhood area, spray silicone onto the hose near the grommet. Caution: Do not spray silicone into one of the exposed DCDC harness connectors.
- Pull the hose through the grommet and remove it from the vehicle.
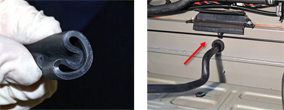
- Spray silicone lubricant onto the grommet and the tip on the
straight end of the hose.

- Fold the straight end of the hose into a U-shape and slide it
into the grommet from the underhood area. Push the hose through the
grommet into the vehicle.
- Working inside the vehicle, secure the hose onto the HVAC unit.
- Reinstall all components that were removed for access.
READ NEXT:
 Heater - PTC (Remove and Replace)
Warning: Only technicians who have been trained in High
Voltage Awareness are permitted to perform this procedure. Proper
personal protective equipment (PPE) and insulating HV gloves with a
Heater - PTC (Dual Motor) (Remove and Replace)
Warning: Only technicians who have been trained in High
Voltage Awareness are permitted to perform this procedure. Proper
personal protective equipment (PPE) and insulating HV gloves with a
Heater - PTC (Dual Motor) (RHD) (Remove and Replace)
Warning: Only technicians who have been trained in High
Voltage Awareness are permitted to perform this procedure. Proper
personal protective equipment (PPE) and insulating HV gloves with a
SEE MORE:
Approved Methods for Transporting
A flatbed truck or comparable transport vehicle is the
recommended method of transporting Model S. The
vehicle can face either direction when using a flatbed.
If Model S must be transported without a flatbed truck,
then wheel lifts and dollies must be used to ensure that
all four wheels are off
Trim - Rear Trunk - Side - RH (Remove and Replace)
Removal
Remove the 'C' post rear trim. (refer to procedure)
Remove the trunk side garnish trim.
Remove the trunk floor trim. (refer to procedure)
Peel back the rear edge of the trunk side trim panel and
disconne
© 2019-2026 Copyright www.tesms.org
