Tesla Model S: HV Rapid Mate Vehicle Side (Remove and Replace)
Tesla Model S (2012-2026) Service Manual / High Voltage System / HV Rapid Mate Vehicle Side (Remove and Replace)
Removal
- Remove the HV battery assembly(refer to procedure).
- Lower the vehicle, but keep it in position to raise it in a later step.
- Remove the 2nd row seat cushion frame (refer to procedure) .
- Remove the high voltage junction box (HVJB) cover:
- 1st Generation, refer to procedure
- 2nd Generation, refer to procedure
- Mark the HV cables from the drive inverter appropriately as
positive and negative.
- Remove the 2 bolts at the rear of the HVJB that secure the HV
cables from the drive inverter and HV battery (torque 9 Nm).
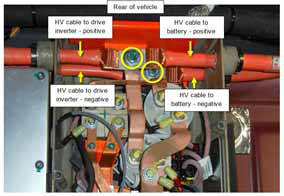
- Pull the HV cables that lead to the HV battery out from the HVJB. Leave the HV cables that lead to the drive inverter in place.
- Raise and support the vehicle (refer to procedure).
- Release the bolt that secures the ground strap to the vehicle
(torque 6 Nm).
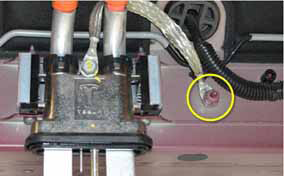
- Remove the 2 bolts that secure the Rapid Mate connector to the
body (torque 9 Nm).

- Remove the 2 bolts that secure the plastic cover to the body
(torque 6 Nm).
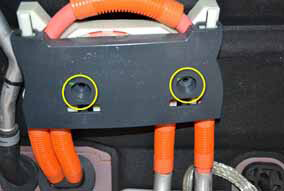
- Pull the HV cables out of the vehicle and remove the Rapid Mate assembly.
Installation procedure is the reverse of removal.
READ NEXT:
 HV Harness - HVJB to Charge Port - 2nd Generation
Warning: Only technicians who have been trained in High
Voltage Awareness are permitted to perform this procedure. Proper
personal protective equipment (PPE) and insulating HV gloves with a
HV Harness - Front Drive Unit to HVJB
Warning: Only technicians who have been trained in High
Voltage Awareness are permitted to perform this procedure. Proper
personal protective equipment (PPE) and insulating HV gloves with a
HV Harness - Rear Drive Unit to HVJB
Warning: Only technicians who have been trained in High
Voltage Awareness are permitted to perform this procedure. Proper
personal protective equipment (PPE) and insulating HV gloves with a
SEE MORE:
Wheel Arch Liner - Lower - Front - LH (Remove and Replace)
Warning: If the vehicle has air suspension, activate "Jack"
mode on the touchscreen before raising and supporting the vehicle.
Removal
Raise and support the vehicle (refer to procedure)
Warning: Do not work on an incorrectly supported
vehicle.
Seat Cushion - Lower - 2nd Row - Executive - LH (Remove and Replace)
Removal
Remove the 2nd row center console (refer to procedure).
Use both hands to firmly pull up on the front of the cushion to
release the 2 clips that secure it to the frame. Do not fully remove
the cushion at this time.
© 2019-2026 Copyright www.tesms.org
