Tesla Model S: Trim - Center Console - Rear (Remove and Replace)
Tesla Model S (2012-2026) Service Manual / Interior trim / Trim - Center Console - Rear (Remove and Replace)
Removal
- Carefully release clips (x8) securing rear end console closing
trim to chassis.
Caution: Take care not to damage component(s).
Caution: Replace any broken clips.
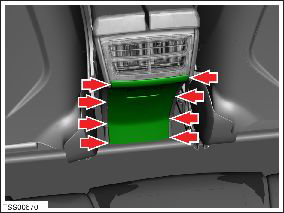
- Release center console end closing trim.
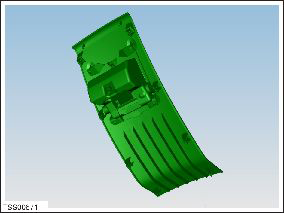
- Remove rear closing trim.
Installation procedure is the reverse of removal.
READ NEXT:
 Assembly - Panel - Wrapped - LH (Remove and Replace)
Removal
Release the clips (x10) that secure the wrapped panel trim.
Note: Components have been removed in this graphic
to aid clarity.
Vent - Center Console (Remove and Replace)
Removal
Remove center console rear closing panel (refer to procedure)
Move front center arm rests forward.
Using a suitable tool depress clips (x4) securing rear vent to
cente
Center Console Assembly (Remove and Replace)
Removal
Remove the drop in center console assembly, if installed (refer
to procedure).
Remove the under-screen cubby.
Remove the LH center console closeout extension (refer to
SEE MORE:
HV Harness - Front Drive Unit to HVJB
Warning: Only technicians who have been trained in High
Voltage Awareness are permitted to perform this procedure. Proper
personal protective equipment (PPE) and insulating HV gloves with a
minimum rating of class 00 (500V) must be worn any time a high
voltage cable is handled. Refer
Compressor - 2nd Generation (Remove and Replace)
Warning: Only technicians who have been trained in High
Voltage Awareness are permitted to perform this procedure. Proper
personal protective equipment (PPE) and insulating HV gloves with a
minimum rating of class 00 (500V) must be worn any time a high
voltage cable is handled. Refer
© 2019-2026 Copyright www.tesms.org
