Tesla Model S: Instrument Cluster (Remove and Replace)
Caution: Before beginning this procedure, prepare a protected surface to set instrument cluster on when it is removed, such as placing a fender cover, towel, or other soft material onto a workbench.
Caution: The screen on the instrument cluster is very easy to scratch. When handling the instrument cluster, only touch the metal frame that surrounds the screen. Do not touch the screen, even when wearing gloves.
Removal
- Disconnect 12V power.
- Rear wheel drive (RWD): Refer to procedure.
- Dual Motor: Refer to procedure.
- Remove the driver's outboard face level vent (refer to procedure).
- Remove driver's inboard face level vent (refer to procedure).
- Remove the screws (x4) that secure the instrument cluster to the
IP carrier (torque 2 Nm).
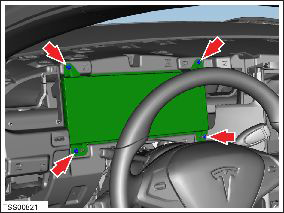
- Carefully release the instrument cluster from the IP carrier to access the harness connections. Caution: Do not touch the screen.
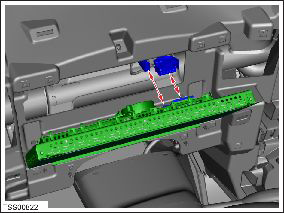
- Disconnect the electrical connectors (x2) from the rear of the
instrument cluster.
Caution: Protect the harnesses connectors from contamination and dirt ingress.
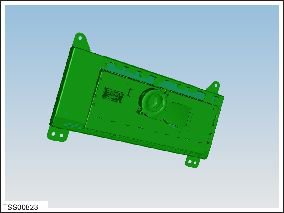
- Carefully remove the instrument cluster and put it onto a
protected surface.
Caution: Do not touch the screen.
Installation procedure is the reverse of removal, except for the following:
Update the vehicle firmware.
READ NEXT:
 Media Control Unit - Touch Screen (Remove and Replace)
Backup
Connect a laptop with Toolbox 2.0 or later to the vehicle.
Select Panels > Gateway and Center Display > MCU
Cloner.
Click MCU Backup to backup the MCU files.
If the
Media Control Unit - Touch Screen (Remove and Install)
Special tool required for this procedure:
Supplier
Part Number
Description
SIM Card - With SIM Extender (Remove and Replace)
Note: Vehicles in North America are not equipped with
a SIM extender; this procedure only applies to vehicles outside
of North America.
Removal
Remove the center underhood
SEE MORE:
Refrigerant evacuation and recharging
The HVAC and battery coolant circuits are sealed to prevent the
discharge of refrigerant. The refrigerant must be recovered before any
removal of system components using the recommended equipment.Two
ports are provided on the HVAC system and are accessible under the hood.
Warning: Ens
Motor - Fan assembly - HVAC (Remove and Replace)
Removal
Power the passenger seat fully rearward for access.
Remove the passenger footwell closing trim (refer to procedure).
Disconnect the fan harness connector and position the harness
aside.
Remove the screw that secures the heating duct to the HVAC
assembly (torq
