Tesla Model S: Face Level Vent - Driver's - Outer (Remove and Replace)
Tesla Model S (2012-2026) Service Manual / Instrument Panels and Pedals / Face Level Vent - Driver's - Outer (Remove and Replace)
Removal
- Remove the driver side lower dash trim (refer to procedure).
- Remove the lower binnacle cover.
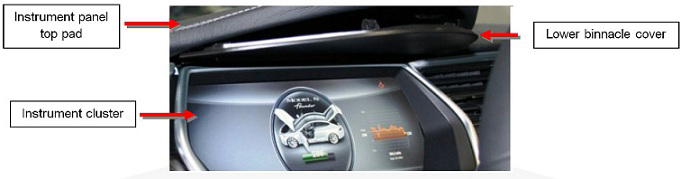
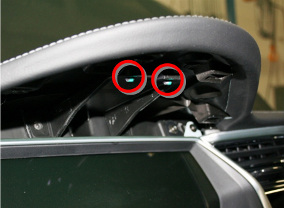
- Remove the 2 screws beneath the lower binnacle cover that secure
the IP top pad to the IP carrier.
- Lower the steering column and remove the steering column gap
hider by releasing the 2 trim clips.
The top screw that secures the vent is underneath the top pad. It is necessary to release the leftmost clips on the top pad in order to access the screw. If possible, use an inflatable wedge. Be very careful not to bend the top pad.
- Apply protective tape along the LH side of the chrome strip that runs just beneath the top pad.
- Very carefully lift up the LH side of the top pad. Caution: Be very careful not to bend the top pad. If necessary, ask an assistant for help.
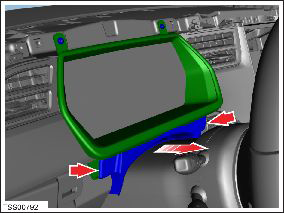
- Remove the 3 screws that secure the face vent & trim to the dash
(torque 1 Nm).
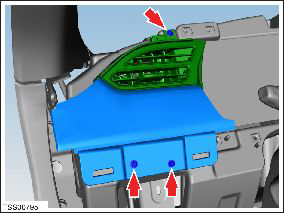
- Remove the 2 screws that secure the face vent & trim (torque 1
Nm).
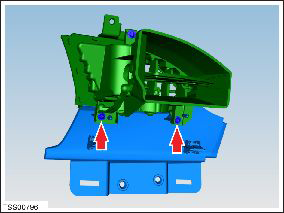
- Remove the face vent assembly..
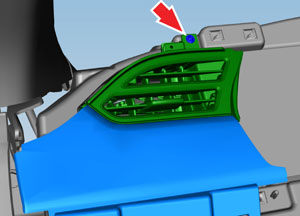
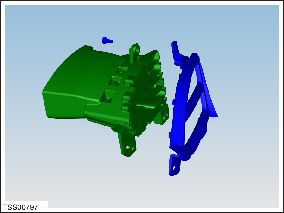
- Remove the 1 screw that secures the face vent bezel (torque 1 Nm).
- Remove the bezel from the face vent.
Installation procedure is the reverse of removal.
READ NEXT:
 Face Level Vent - Driver's - Inner (Remove and Replace)
Removal
Remove driver side lower dash trim (refer to procedure).
Remove the lower binnacle cover.
Remove the 2 screws b
Face Level Vent - Front Passenger's - Outer (Remove and Replace)
Removal
Remove RH instrument panel finisher assembly (refer to
procedure)
Remove screws (x3) securing passenger outer face vent to trim
(torque 1 Nm).
Remove vent from trim.
SEE MORE:
Brake Caliper Pad Slides
Note: This is recommended for cold weather regions.
Note: Cleaning and lubricating the caliper pad
slides/abutments is not included in the Annual Service price.
Note: Perform the following steps on all 4 calipers.
Remove the pad retaining pins and collect the anti-rattle
spr
Trim - 'B' Post - Upper - LH (Remove and Install)
Removal
Remove the LH lower 'B' post trim (refer to procedure).
Carefully release the clips (x4) that secure the 'B' post upper
trim to the body by gently pulling the lower edge away from the body
and releasing the top alignment dowel.
Caution: Take car
© 2019-2026 Copyright www.tesms.org
