
Tesla Model S: Lifting and Jacking
Raising and supporting the vehicle
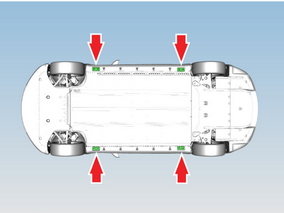
Jacking points on the Model S
Two post lift
Refer to procedure 10000205 for instructions.
Warning: Death, serious injury or damage to the vehicle can occur if the vehicle is improperly lifted on a two post lift.
Hydraulic jack
A hydraulic jack with a minimum 1500 kg (3300 lb) load capacity must be used.
Warning: For vehicles with air suspension, suspension 'Jack' mode must be activated before lifting the vehicle with a hydraulic jack (refer to procedure 10000105). Failure to do this might lead to suspension damage and could cause serious personal injury.
Warning: Do not start work on the underside of the vehicle until safety stands have been positioned under the body reinforced pads. Never get under a vehicle that is only supported by a jack.
Warning: Always chock the wheels when jacking.
READ NEXT:
 Fluids and Capacities
Fluids
Air conditioning
Depending on its intended sales region, the air conditioning system is
filled with R134a or 1234yf refrigerant. Refer to the label on the RH
frunk trim.
If oil nee
Special Tools - HV Battery Alignment Rods
The HV battery alignment rods assist in aligning the HV battery during
installation.
Note: This tool is intended to be used by 2 technicians.
To use the alignment rods:
Position the tabl
SEE MORE:
Sensor - Ride Height - Rear - LH (Remove and Replace)
Warning: If the vehicle has air suspension, activate "Jack"
mode on the touchscreen before raising and supporting the vehicle.
Removal
Remove the road wheel (refer to procedure).
Disconnect the ride height sensor connector and harness.
Remove the nut that secures the link t
Event Data Recorder (EDR)
Model S is equipped with an event data recorder (EDR).
The main purpose of an EDR is to record, in certain crash
or near crash-like situations, such as an air bag
deployment or hitting a road obstacle, data to better
understand how the vehicle's systems performed. The
EDR is designed to record
