Tesla Model S: Module - Electric Park Brake - EPB (Remove and Replace)
Tesla Model S (2012-2026) Service Manual / Electrical / Module - Electric Park Brake - EPB (Remove and Replace)
Removal
- Remove the RH side trunk trim (refer to procedure).
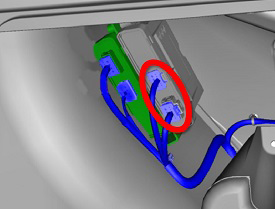
- Disconnect the harness connectors (x2) from the electric park
brake (EPB) module.
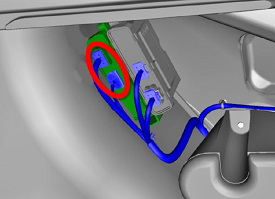
- Disconnect the harness connections (x2) from the liftgate
control module.
- Remove the nuts (x4) that secure the bracket to the wheelhouse
studs (torque 3 Nm).
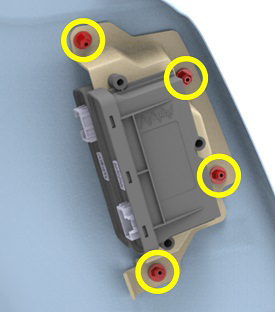
- Remove the bracket and modules assembly.
- Remove the nuts and bolts (x3) that secure the modules to the
bracket (torque 2 Nm).
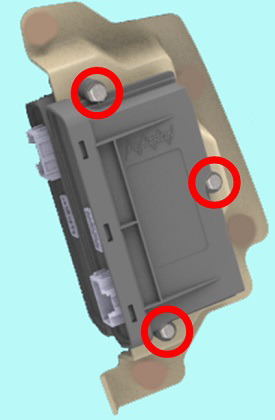
- Remove the EPB module from the bracket.
Installation procedure is the reverse of removal, except for the following: Use Toolbox to update or redeploy the firmware:
- If the vehicle is not running the latest firmware, run the "Vehicle Firmware Update" procedure.
- If the vehicle is running the latest firmware, run the "Firmware Redeploy" procedure.
READ NEXT:
 Module - Sunroof Controller (Remove and Replace)
Removal
Remove the body control module (BCM) (refer to procedure)
Remove the 4 bolts and 1 nut that secure the sunroof controller
mounting bracket to the body (torque 8 Nm).
Module - Sunroof Controller (RHD) (Remove and Replace)
Warning: If the 12V power supply is disconnected, do
not attempt to open any doors with door glass in closed position.
Failure to follow this instruction could result in door glass
shat
Module - Air Suspension - ECU (Remove and Replace)
Warning: If the 12V power supply is disconnected, do
not attempt to open any doors with door glass in closed position.
Failure to follow this instruction could result in door glass
shat
SEE MORE:
Gearbox Fluid - Large Rear Drive Unit (Remove and Replace)
Warning: If the vehicle has air suspension,
activate "Jack" mode on the touchscreen before raising and
supporting the vehicle.
Drain & Refill
Raise and support the vehicle (refer to procedure).
Warning: Do not work on an incorrectly supported vehicle.
Actuator - Inlet (Remove and Replace)
Removal
Remove glove box assembly (refer to procedure)
Disconnect actuator harness connector.
Remove screws (x3) securing recirculation actuator to HVAC
assembly (torque 1 Nm).
Remove recirculation actuator.
Caution: Take care not to damage component(s).
© 2019-2026 Copyright www.tesms.org
