Tesla Model S: Low Voltage Power Socket
Your Model S has a power socket located in the center console's rear compartment. To access the low voltage socket, open the front compartment of the center console.
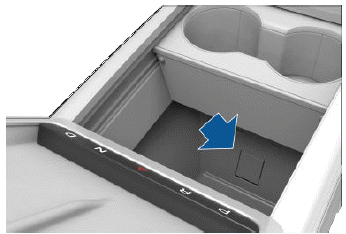
The power socket is suitable for accessories requiring up to 12A continuous draw (16A peak).
NOTE: Power is available whenever the vehicle is considered "awake". The vehicle may be awake for many reasons. For example, when using features such as Summon, or when features such as Preconditioning, Cabin Overheat Protection, Keep Climate On, Dog Mode, Camp Mode, Sentry Mode, etc. are enabled. The vehicle is also awake whenever the low voltage battery is being charged or is in use, during high voltage charging, when the vehicle is communicating with the mobile app, etc. Leaving an accessory plugged in does not deplete the low voltage battery.
WARNING: The power socket and an accessory's connector can become hot.
WARNING: To prevent excessive interference with the vehicle's electronics, Tesla recommends that you do not plug any non-Tesla accessories, including power inverters, into the low voltage power socket. However, if you do use a non-Tesla accessory and notice any malfunctions or unexpected behavior, such as indicator lights, alert messages, or excessive heat from the accessory, unplug the accessory from the low voltage power socket immediately.
NOTE: A power inverter plugged into the low voltage power socket must support 16V DC input to function.
CAUTION: Do not attempt to jump start Model S using the low voltage power socket. Doing so can result in damage.
READ NEXT:
 Coat Hangers
Your Model S has a coat hanger on each side of the
vehicle above the rear window in the second row, next to
the reading light. Push the coat hanger to release it.
Push it again to retract it.
Acti
SEE MORE:
Frame - Panoramic Roof Assembly (Remove and Replace) -
Installation
Installation
Use a scraping tool to remove the majority of
the adhesive from the body, leaving a smooth layer of the original
adhesive approximately 1 mm thick or less.
Remove all existing butyl patches and replace
them with new ones
Sentry Mode - View Live Camera
NOTE: View Live Camera requires premium connectivity.
It also requires that version 4.2.1 (or newer) of the Tesla
mobile app is installed on a phone that has been paired
as a key to Model S.
When Sentry Mode is enabled, you can use the mobile
app to remotely view the area surrounding Model S as
