Tesla Model S: Wheel Arch Liner - Upper - Front - LH (Remove and Replace)
Tesla Model S (2012-2026) Service Manual / Exterior fittings / Wheel Arch Liner - Upper - Front - LH (Remove and Replace)
Warning: If the vehicle has air suspension, activate "Jack" mode on the touchscreen before raising and supporting the vehicle.
Removal
- Raise and support the vehicle (refer to procedure) Warning: Do not work on an incorrectly supported vehicle.
- Remove front lower wheel arch liner (refer to procedure)
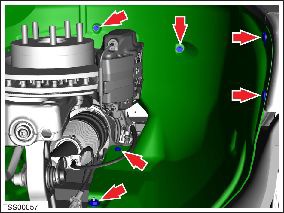
- Remove plastic rivets (x5) and nut (x1) securing wheel arch
liner to body (torque 4 Nm).
Note: Note installed position of components before removal.
- Remove wheel arch liner.
Installation procedure is the reverse of removal.
READ NEXT:
 Wheel Arch Liner - Rear - LH (Remove and Replace)
Warning: If the vehicle has air suspension, activate "Jack"
mode on the touchscreen before raising and supporting the vehicle.
Removal
Raise and support the vehicle (refer to pro
Wheel Arch Liner - Lower - Front - LH (Remove and Replace)
Warning: If the vehicle has air suspension, activate "Jack"
mode on the touchscreen before raising and supporting the vehicle.
Removal
Raise and support the vehicle (refer to pro
Panel - Aero Shield - Front (Remove and Replace)
Warning: If the vehicle has air suspension, activate "Jack"
mode on the touchscreen before raising and supporting the vehicle.
Removal
Raise and support the vehicle (refer to pro
SEE MORE:
Bushing Installation, Front Motor Mount
Use brake cleaner to clean the threaded rod and the nut bearing
assemblies.
Use 3M Spray Lube 08878 or equivalent to lubricate the threaded
rod and the nut bearing assemblies.
Slide the bushing into the left side of the front motor mount so
that the shorter cavities are horiz
Wall plug adapter error - Charge rate reduced
Plug adapter fully into Mobile Connector and retry
Your Mobile Connector is unable to communicate with the wall plug adapter.
Because your Mobile Connector cannot
monitor the wall plug adapter temperature, charge current is automatically
reduced to 8A.
It is recommended that you try the followin
© 2019-2026 Copyright www.tesms.org
