Tesla Model S: Module - Door Controller (Remove and Replace)
Tesla Model S (2012-2026) Service Manual / Electrical / Module - Door Controller (Remove and Replace)
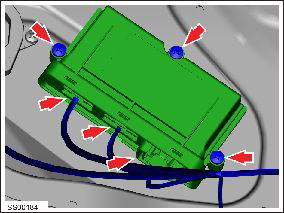
Removal
- Remove the door trim cover (refer to procedure)
- Disconnect the door module harness connectors (x3).
- Remove the screws (x3) that secure the control module to the door panel (torque 2 Nm).
- Remove the door controller module.
- Installation procedure is the reverse of removal, except for the following.
- In the Toolbox "Pektron Body Controls Configuration" panel, select the appropriate door controller and press the Play button.
- Update the vehicle firmware after installing a new door controller.
Note: The front and rear doors on the applicable side of the vehicle must be open while performing the firmware update.
READ NEXT:
 Module - Liftgate Control (Remove and Replace)
Removal
Remove the RH side trunk trim (refer to procedure).
Disconnect the harness connectors (x2) from the electric park
brake (EPB) module.
Module - Park Assist (Remove and Replace)
Removal
Remove the LH side rear trunk trim for access (refer to
procedure).
Disconnect the harness connections (x3) from the module.
Caution: Mark the harnesses so that th
Module - Electric Park Brake - EPB (Remove and Replace)
Removal
Remove the RH side trunk trim (refer to procedure).
Disconnect the harness connectors (x2) from the electric park
brake (EPB) module.
SEE MORE:
Adjusting Steering Yoke Position
To adjust the steering yoke, touch Controls and touch
the Steering icon.
Use the left scroll button on the steering yoke to move
the steering yoke to the desired position:
To adjust the height/tilt angle of the steering yoke,
roll the left scroll button up or down.
To move the steering yoke
Charging equipment not ready
See equipment instructions to start charging
Charging cannot begin because the charging station is communicating to your
vehicle that either the external
charging equipment is not ready or charging is not authorized. The control pilot
signal that communicates between
the charging station and you
© 2019-2026 Copyright www.tesms.org
