Tesla Model S: Module - Liftgate Control (Remove and Replace)
Tesla Model S (2012-2026) Service Manual / Electrical / Module - Liftgate Control (Remove and Replace)
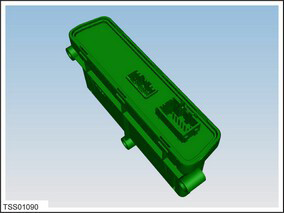
Removal
- Remove the RH side trunk trim (refer to procedure).
- Disconnect the harness connectors (x2) from the electric park
brake (EPB) module.
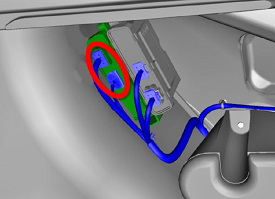
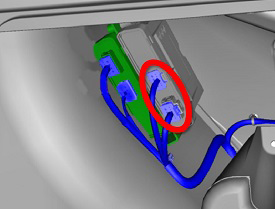
- Disconnect the harness connections (x2) from the liftgate
control module.
- Remove the nuts (x4) that secure the bracket to the wheelhouse
studs (torque 3 Nm).
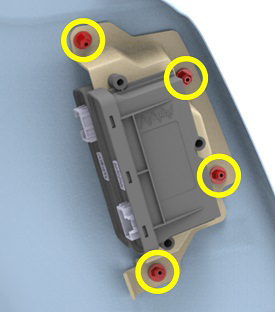
- Remove the bracket and modules assembly.
- Remove the nuts and bolts (x3) that secure the modules to the
bracket (torque 2 Nm).
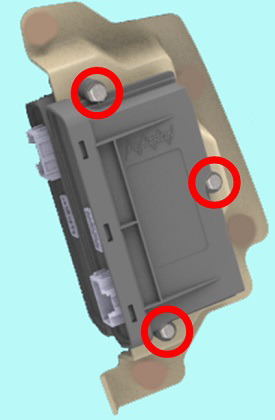
- Remove the liftgate control module from the bracket.
Installation procedure is the reverse of removal, except for the following: Update or redeploy the firmware:
- If the vehicle is not running the latest firmware, perform a full firmware update.
- If the vehicle is running the latest firmware, perform a
firmware redeploy:
- In Toolbox, select Views > Firmware and ECU Programming > Firmware Redeploy.
- Select the Service Redeploy tab.
- Click the Start Routine button.
READ NEXT:
 Module - Park Assist (Remove and Replace)
Removal
Remove the LH side rear trunk trim for access (refer to
procedure).
Disconnect the harness connections (x3) from the module.
Caution: Mark the harnesses so that th
Module - Electric Park Brake - EPB (Remove and Replace)
Removal
Remove the RH side trunk trim (refer to procedure).
Disconnect the harness connectors (x2) from the electric park
brake (EPB) module.
Module - Sunroof Controller (Remove and Replace)
Removal
Remove the body control module (BCM) (refer to procedure)
Remove the 4 bolts and 1 nut that secure the sunroof controller
mounting bracket to the body (torque 8 Nm).
SEE MORE:
FCC and IC Certification
* The in-cabin radar is restricted to factory installation.
The devices listed above comply with Part 15 of the FCC rules and Industry
Canada's license-exempt RSS
Standard(s) and EU Directive 2014/53/EU.
Operation is subject to the following two conditions: (1) this device may not
cause harmfu
Enabling and Customizing Navigate
on Autopilot
To enable Navigate on Autopilot, touch Controls >
Autopilot > Navigate on Autopilot (Beta). Then, to
customize how you want Navigate on Autopilot to
operate, touch Customize Navigate on Autopilot:
Enable At Start Of Every Trip: Choose whether or not
you want to automatically enable Navi
© 2019-2026 Copyright www.tesms.org
