Tesla Model S: Module - Sunroof Controller (RHD) (Remove and Replace)
Tesla Model S (2012-2026) Service Manual / Electrical / Module - Sunroof Controller (RHD) (Remove and Replace)
Warning: If the 12V power supply is disconnected, do not attempt to open any doors with door glass in closed position. Failure to follow this instruction could result in door glass shatter.
Note: Before disconnecting the 12V power supply, ensure that the driver's door window is fully open. Failure to follow this instruction could result in vehicle lockout.
Removal
- Move the passenger seat to its rearmost position.
- Disconnect 12V power.
- Rear wheel drive (RWD): Refer to procedure.
- Dual Motor: Refer to procedure.
- Remove the LH footwell cover (refer to procedure).
- Carefully peel back the front LH carpet for access. Caution: Take care not to damage component(s).
- Remove the bolts (x3) that secure the module cover panel.
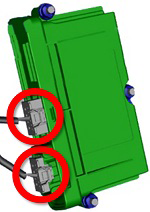
- Disconnect the controller harness connectors (x2).
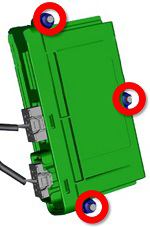
- Remove the nuts (x3) that secure the controller to the studs on
the bulkhead (torque 5 Nm).
- Remove the controller from the vehicle.
Installation procedure is the reverse of removal, except for the following:
-
Use Toolbox to update or redeploy the firmware:
- If the vehicle is not running the latest firmware, run the "Vehicle Firmware Update" procedure.
- If the vehicle is running the latest firmware, run the "Firmware Redeploy" procedure.
READ NEXT:
 Module - Air Suspension - ECU (Remove and Replace)
Warning: If the 12V power supply is disconnected, do
not attempt to open any doors with door glass in closed position.
Failure to follow this instruction could result in door glass
shat
Module - Air Suspension - ECU (Remove and Install)
Warning: If the 12V power supply is disconnected, do
not attempt to open any doors with door glass in closed position.
Failure to follow this instruction could result in door glass
shat
Module - Air Suspension - ECU (RHD) (Remove and Replace)
Warning: If the 12V power supply is disconnected, do
not attempt to open any doors with door glass in closed position.
Failure to follow this instruction could result in door glass
shat
SEE MORE:
Coolant Heater - Electric - Battery - 2nd Generation (Remove and Replace)
Warning: Only technicians who have been trained in High
Voltage Awareness are permitted to perform this procedure. Proper
personal protective equipment (PPE) and insulating HV gloves with a
minimum rating of class 00 (500V) must be worn any time a high
voltage cable is handled. Refer
Cleaning a Camera
To ensure a clear picture, the camera lens must be clean
and free of obstructions. Remove any build-up of dirt or
debris by spraying water onto the camera lens with a
spray bottle or pressure washer.
CAUTION: Do not attempt to remove dirt or debris
by wiping an exposed lens with your hands or
© 2019-2026 Copyright www.tesms.org
