Tesla Model S: Motor - Active Louver - Front Fascia (Remove and Replace)
Tesla Model S (2012-2026) Service Manual / Thermal Management / Motor - Active Louver - Front Fascia (Remove and Replace)
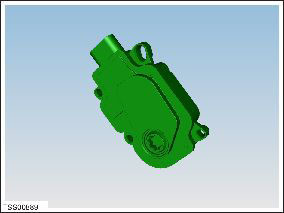
Removal
- Remove front fascia active louver vent (refer to procedure)
- Remove screws (x3) securing louver drive motor to vent assembly
(torque 1 Nm).
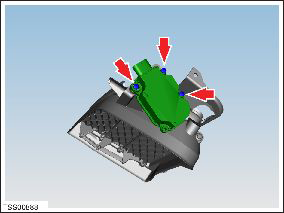
- Remove louver drive motor.
Note: Clean the affected areas before installation.
Installation procedure is the reverse of removal.
READ NEXT:
 Vent - Motorized - Front Fascia - LH (Remove and Replace)
Removal
If the vehicle is equipped with 1st generation front fascia
applique, remove front fascia applique (refer to procedure) .
Remove ankle catcher foam, if equipped.
Air bag - Driver's (Remove and Replace)
Warning: If the 12V power supply is disconnected, do
not attempt to open the front doors with door glass in closed
position. Failure to follow this instruction could result in
door glas
SEE MORE:
Glove Box - Latch Release (Remove and Replace)
Removal
Remove glove box assembly (refer to procedure)
Remove screws (x3) securing latch release module to glove box
assembly.
Remove latch module from glove box.
3 Way Coolant Valve - Radiator Bypass (Remove and Replace)
Warning: If the 12V power supply is disconnected, do
not attempt to open any doors with door glass in closed position.
Failure to follow this instruction could result in door glass
shatter.
Note: Before disconnecting the 12V power supply,
ensure that the driver's door window
© 2019-2026 Copyright www.tesms.org
