Tesla Model S: Panoramic Roof
Annual Service
Note: Not all of the procedures listed here need to be performed at each Annual Service. Refer to SC-15-00-001 for a list of the procedures to perform at the relevant service interval.Check for Alerts, Repair any Issues Found, Clear Alerts
- Connect a laptop with Toolbox to the vehicle.
- In Toolbox, select Perspectives > Predefined Perspectives > Service Default.
- Check the Currently Active Alerts, Alert History, and DTCs panels.
- After performing any necessary repairs, clear any DTCs:
- In the DTCs panel, select the "Clear DTC" radio button.
- Click the Start/Play button.
- Fully open the sliding glass.
- Use compressed air to blow out the drain hoses. Caution: Do not exceed 25 PSI (1.7 Bar).
- Wrap a clean cloth around a plastic pry tool or other thin tool,
then use it to remove dirt and old grease from the 4 channels on
each side of the panoramic roof.
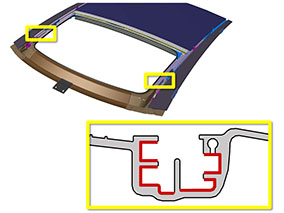
- Apply Klübersynth noise reduction grease to the 4 channels. Caution: Use only Klübersynth noise reduction grease, Tesla part number 1031102-00-A. Other greases can permanently damage the roof seals.
- Move the sliding glass to the 30% open position.
- Remove the sliding glass (refer to procedure).
- Apply Klübersynth noise reduction grease to the sections of the tracks that were blocked by the sliding glass.
- Visually inspect the links and shoes for damage.
- Reinstall the sliding glass.
- Calibrate the panoramic roof (refer to procedure).
- Use alcohol wipes to remove any grease from the glass and appliques. Use a clean, dry cloth to remove grease from the rubber seals.
Caution: Do not use alcohol to remove grease from rubber seals. Alcohol degrades the rubber seals.
Wiper BladesReplace the wiper blades (refer to procedure).
Cabin Air Filter
Replace the particulate filter (refer to procedure).
Coolant
Drain and refill the cooling system (refer to procedure).
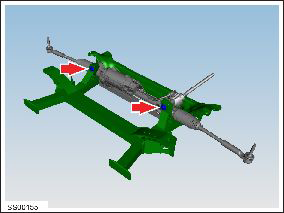
Steering Gear Bolts
Ensure that the bolts (x2) that secure the steering rack to the subframe are torqued to 175 Nm.
Note: Components have been removed in this graphic to aid clarity.
Hood Release Latch RWD vehicles: Clean the secondary latch, then apply the proper lubricant (refer to procedure).
Dual Motor vehicles: Clean the latch, then apply the proper lubricant (refer to procedure).
A/C Desiccant Bag
Replace the desiccant bag (refer to procedure).
Brake Fluid
Perform the full system bleed procedure (refer to procedure).
READ NEXT:
 Brake Caliper Pad Slides
Note: This is recommended for cold weather regions.
Note: Cleaning and lubricating the caliper pad
slides/abutments is not included in the Annual Service price.
Note: Perform the following
Body
Jack Mode Activation
Setting Procedure
Power up the touchscreen.
Note: Suspension height can only be
lowered when all doors are closed.
To
Raise Vehicle - 2 Post Lift
Warning: "Jack mode" must be activated on vehicles with air
suspension before lifting the vehicle. Failure to do this might lead
to suspension damage and could cause serious personal injury.
SEE MORE:
DCDC Converter - 1st Generation (Remove and Replace)
Warning: Only technicians who have been trained in High
Voltage Awareness are permitted to perform this procedure. Proper
personal protective equipment (PPE) and insulating HV gloves with a
minimum rating of class 00 (500V) must be worn any time a high
voltage cable is handled. Refer
Navigate on Autopilot
NOTE: Depending on market region, vehicle
configuration, options purchased, and software version,
your vehicle may not be equipped with Navigate on
Autopilot, or the feature may not operate exactly as
described.
NOTE: Navigate on Autopilot is a BETA feature.
When using Autosteer on a controlled-
