Tesla Model S: Back Plate - Door - Exterior Handle - Rear - LH (Remove and Replace)
Tesla Model S (2012-2026) Service Manual / Closures / Back Plate - Door - Exterior Handle - Rear - LH (Remove and Replace)
Removal
- Remove door handle for access (refer to procedure)
- Position handle assembly on a soft working surface.
- Remove door handle rear seal.
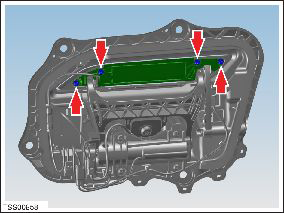
- Remove screws (x4) securing handle grip backplate (torque 2 Nm).
- Remove handle.
- Install back plate starting with inner fixings first. Ensure the LED wiring is correctly routed to avoid chafing.
- Install the door handle back seal
- Check door handle for smooth operation.
READ NEXT:
 LED - Door - Exterior Handle - Front - LH (Remove and Replace)
Removal
Remove backplate grip (refer to procedure)
Disconnect LED wiring and remove from door grip.
Installation
Motor - Door - Exterior Handle - Front - LH (Remove and Replace)
Removal
Remove door handle for access (refer to procedure)
Position handle assembly on a soft working surface.
Remove door handle rear seal.
Release motor harness connector.
R
Motor - Door - Exterior Handle - Rear - LH (Remove and Replace)
Removal
Remove door handle for access (refer to procedure)
Position handle assembly on a soft working surface.
Remove door handle rear seal.
Remove cable ties securing door pressu
SEE MORE:
Wheels and Tires
Wheel Specifications (Factory)
NOTE: For instructions on how to jack/lift Model S, see Jacking and
Lifting.
Tire Specifications (Factory)
Understanding Tire Markings
Laws require tire manufacturers to place standardized information on the
sidewall of all tires. This information
identifies and d
Bash Plate - Front - Stamping (Remove and Replace)
Removal
Remove the front aero shield panel
(refer to procedure).
Remove the bash plate extrusion
(refer to procedure).
Remove and discard the bolts (x2), shoulder
washers (x2), and washers (x2) that secure the bash plate stamping
to the front subframe skid
© 2019-2026 Copyright www.tesms.org
