Tesla Model S: Pipe - High Pressure - Compressor to Condenser (Remove and Replace)
Tesla Model S (2012-2026) Service Manual / Thermal Management / Pipe - High Pressure - Compressor to Condenser (Remove and Replace)
Removal
- Recover refrigerant from the vehicle (refer to procedure).
- Remove the underhood storage unit (refer to procedure).
- Remove the bolt that secures the high pressure pipe to the compressor (torque 10 Nm). Caution: Plug pipe connections to prevent ingress of moisture or dirt. Caution: Remove and discard O-rings.
- Disconnect the high pressure temperature transducer connector.
- Remove the front LH lower wheel arch liner (refer to procedure).
- Remove the nut that secures the high pressure pipe to the gas
cool condenser (torque 8 Nm).
Caution: Plug pipe connections to prevent ingress of moisture or dirt.
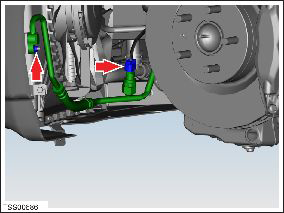
- Remove the nut that secures the high pressure pipe to the
chassis rail (torque 6 Nm).
- Remove the high pressure pipe.
Installation procedure is the reverse of removal, except for the following:
Caution: Lubricate new O-rings with clean refrigerant oil.
Verify that the A/C works as expected.
READ NEXT:
 Pipe - High Pressure - Compressor to Condenser (Dual Motor) (Remove and
Replace)
Pipe - High Pressure - Compressor to Condenser (Dual Motor) (Remove and
Replace)
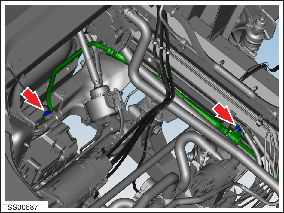
Removal
Position the vehicle on a lift, but do not raise it at this
time.
Recover refrigerant from the vehicle (refer to procedure).
Remove the 12V battery (refer to procedure).
Pipe - Low Pressure - Charge Port (Remove and Replace)
Removal
Recover refrigerant from the vehicle (refer to procedure).
Remove the underhood storage unit (refer to procedure).
Disconnect the low pressure temperature transducer connector
Pipe - High Pressure - Charge Port (Dual Motor) (Remove and Replace)
Warning: If the 12V power supply is disconnected, do
not attempt to open any doors with door glass in closed position.
Failure to follow this instruction could result in door glass
shat
SEE MORE:
Finisher - Liftgate - Rear Window - Upper (Remove and Replace)
Removal
Position the vehicle for access to the tailgate.
Open the tailgate to working height.
Carefully release the clips (x4) that secure the upper trim to
the tailgate.
Caution: Replace any broken clips.
TPMS Sensor - ID Learn Procedure - Continental
Setup
Press the Power button and watch the display.
When the display shows "ATEQ VT30", note the version number:
If the version is EA1-07, refer to TN-14-92-005, "ATEQ TPMS Tool
Firmware Update" to update the tool's firmware.
If the version is hi
© 2019-2026 Copyright www.tesms.org
