Tesla Model S: Pipe - Low Pressure - Charge Port (Remove and Replace)
Tesla Model S (2012-2026) Service Manual / Thermal Management / Pipe - Low Pressure - Charge Port (Remove and Replace)
Removal
- Recover refrigerant from the vehicle (refer to procedure).
- Remove the underhood storage unit (refer to procedure).
- Disconnect the low pressure temperature transducer connector.
- Remove the bolt that secures the low pressure pipe to the
compressor (torque 15 Nm).
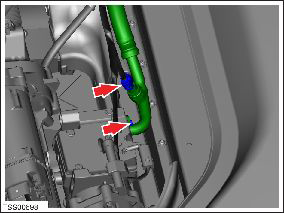
- Remove the nut that secures the pipe retaining plate to the evaporator TXV (torque 6 Nm).
- Remove the bolt that secures the A/C pipe bracket to the
cross-brace (torque 6 Nm).

- Release the low pressure charge port pipe from the bracket.
- Remove the bolt that secures the low pressure charge port pipe at the union to the low pressure chiller pipe (torque 8 Nm). Caution: Plug pipe connections to prevent ingress of moisture or dirt. Caution: Remove and discard O-rings.
- Remove the bolts (x2) that secure the A/C pipe brackets to the
crossmember and the RH shock tower (torque 6 Nm).
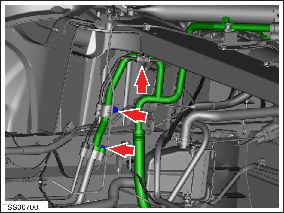
- Release the low pressure charge port pipe from the brackets (x2).
- Maneuver and remove the pipe.
- Installation procedure is the reverse of removal, except for the following:
- Replace the A/C pipe O-rings. Caution: Lubricate new O-rings with clean refrigerant oil.
- If the new pipe does not have a low pressure temperature transducer, install a refrigeration pressure sensor dummy plug on the vehicle-side electrical harness connector.
READ NEXT:
 Pipe - High Pressure - Charge Port (Dual Motor) (Remove and Replace)
Warning: If the 12V power supply is disconnected, do
not attempt to open any doors with door glass in closed position.
Failure to follow this instruction could result in door glass
shat
Pipe - High Pressure - Gas Cool to Sub-Cool Condenser (Remove and Replace)
Removal
Recover refrigerant from the vehicle (refer to procedure)
Remove front aero shield panel (refer to procedure)
Remove nuts (x2) securing inboard air conditioning link pipe to
Pipe - Low Pressure - Chiller (Remove and Replace)
Removal
Recover refrigerant from the vehicle (refer to procedure)
Remove front skid plate (refer to procedure)
Remove nut (x1) securing pipe retaining plate to chiller TXV
(torque
SEE MORE:
Seat Belt Pre-tensioners
The front seat belts are equipped with pre‑tensioners
that work in conjunction with the airbags in a severe
frontal collision. The pre‑tensioners automatically retract
both the seat belt anchor and the seat belt webbing,
reducing slack in both the lap and diagonal portions of
the belts, res
Brake Sensor Cluster - ESC (Remove and Replace)
Removal
Remove center console assembly
(refer to procedure)
Disconnect wiring harness connector.
Carefully cut acoustic padding covering ESC
sensor.
Peel back acoustic padding to expose ESC
module.
© 2019-2026 Copyright www.tesms.org
