Tesla Model S: Position Sensor - Door - Exterior Handle - Front - LH (Remove and Replace)
Tesla Model S (2012-2026) Service Manual / Closures / Position Sensor - Door - Exterior Handle - Front - LH (Remove and Replace)
Removal
- Remove door handle for access (refer to procedure)
- Remove door handle rear seal.
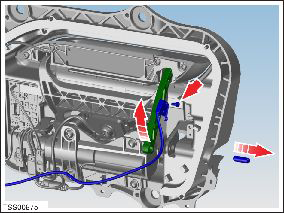
- Remove control link pivot pin to allow control link to be released from housing.
- Position control link and remove screw securing position sensor to link (torque 1 Nm).
- Remove screw securing position sensor to housing (torque 1.5
Nm).

- Release wiring harness and remove position sensors (x2).
- Remove screw securing position sensor to bracket (torque 1 Nm). Remove bracket.
- Installation procedure is the reverse of removal, except for the following.
- Position all wiring around the housing and secure as necessary with cable ties.
READ NEXT:
 Position Sensor - Door - Exterior Handle - Rear - LH (Remove and Replace)
Removal
Remove door handle for access (refer to procedure)
Remove door handle rear seal.
Remove control link pivot pin to allow control link to be
released from housing.
 Fork and Control Link - Door - Exterior Handle - Front - LH (Remove and
Replace)
Removal
Remove Door Motor (refer to procedure)
Remove Door Grip (refer to procedure)
Remove press sensor screw.
Rel
 Fork and Control Link - Door - Exterior Handle - Rear - LH (Remove and
Replace)
Removal
Remove Door Motor (refer to procedure)
Remove Door Grip (refer to procedure)
Remove press sensor screw.
Rel
SEE MORE:
 Forward Junction Box - 2nd Generation - 40 Amp Fuse (RWD) (Remove and
Replace)
Warning: Only technicians who have been trained in High
Voltage Awareness are permitted to perform this procedure. Proper
personal protective equipment (PPE) and insulating HV gloves with a
minimum rating of class 00 (500V) must be worn any time a high
voltage cable is handled. Refer
 Underhood Storage Unit (Dual Motor) (Remove and Replace)
Removal
Remove the underhood aprons.
Peel back the carpeting at the rear of the underhood storage
unit. Release the bolts (x2) (torque 8 Nm).
Peel back the carpeting at the front of the underhood storage
unit.
© 2019-2026 Copyright www.tesms.org

