Tesla Model S: Fork and Control Link - Door - Exterior Handle - Front - LH (Remove and Replace)
Tesla Model S (2012-2026) Service Manual / Closures / Fork and Control Link - Door - Exterior Handle - Front - LH (Remove and
Replace)
Removal
- Remove Door Motor (refer to procedure)
- Remove Door Grip (refer to procedure)
- Remove press sensor screw.
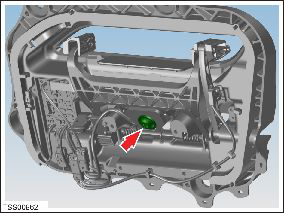
- Release door press sensor wiring connector.
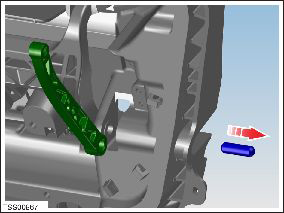
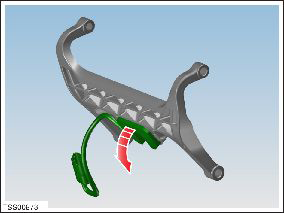
- Remove pivot pin connecting control link to PVT cartridge.
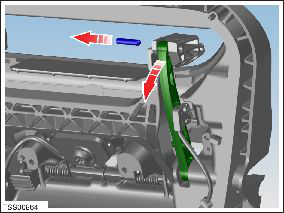
- Position control link and remove screw securing position sensor
to link (torque 1 Nm).
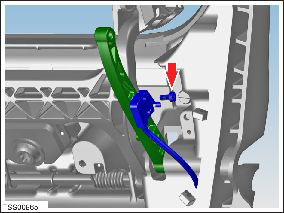
- Remove screw securing position sensor to housing, release
connector and remove position sensor and harness assembly (torque
1.5 Nm).
- Remove control link pivot pin to housing and remove control
link.
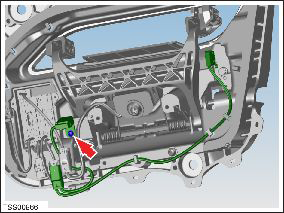
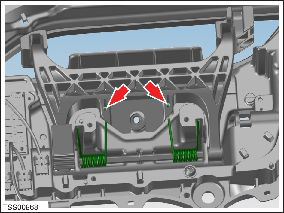
- Release torsion springs (x2) from fork.
- Remove circlip retaining fork pivot shaft.
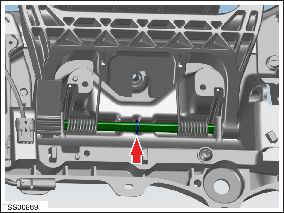
- Using a suitable drift, remove fork pivot shaft, collect torsion
springs and paddle gear.
Note: DO NOT use excessive force to fit the pivot shaft. If all components are correctly aligned, firm hand pressure on a drift will be sufficient.

- Remove fork assembly from housing.
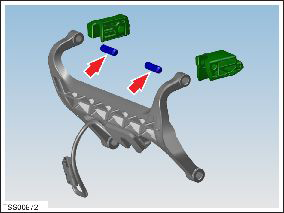
- Remove pivot pins securing pvt cartridges to fork, taking note
of installed position. Remove cartridges.
- If door press sensor is to be replaced. Using a suitable flat
blade, release double sided tape and remove sensor from the fork.
- If door pressure sensor is to be replaced, remove double sided tape backing and install sensor to fork.
- Install the PVT cartridges to the fork and fit pivot pins. Check orientation of cartridges.
- Position paddle gear to fork and install fork to housing.
- Install torsion springs to housing.
- Install the fork pivot shaft, ensuring the flat section is uppermost. Align the paddle gear, springs and fork to housing as pivot is inserted. Note: DO NOT use excessive force to fit the pivot shaft. If all components are correctly aligned, firm hand pressure on a drift will be sufficient.
- Install circlip retaining fork pivot shaft and engage the torsion springs to fork.
- Position and align control link to housing, ensure orientation is correct. Install pivot pin to control link.
- Align harness and position sensors to housing control link. Align position sensor dowels and install the screws.
- Align control link to PVT cartridge and fit pivot pin
- Install the door press sensor, adjusting the screw to engage the first ten threads.
READ NEXT:
 Fork and Control Link - Door - Exterior Handle - Rear - LH (Remove and
Replace)
Fork and Control Link - Door - Exterior Handle - Rear - LH (Remove and
Replace)
Removal
Remove Door Motor (refer to procedure)
Remove Door Grip (refer to procedure)
Remove press sensor screw.
Rel
Position Switch Harness - Door Handle (Remove)
Note: This procedure is valid for all 2nd generation
door handles.
Special tools required for this procedure:
Supplier
Part Number
Description
SEE MORE:
Control Arm - Upper - Front - LH (Remove and Replace)
Warning: If the vehicle has air suspension, activate "Jack"
mode on the touchscreen before raising and supporting the vehicle.
Removal
Position the vehicle in preparation for raising it, but keep the
vehicle at ground level at this time.
Remove the LH underhood apron (refer
Battery - Auxiliary - 12V (RWD) (Remove and Replace)
Warning: If the 12V power supply is disconnected, do
not attempt to open any doors with door glass in closed position.
Failure to follow this instruction could result in door glass
shatter.
Note: Before disconnecting the 12V power supply,
ensure that the driver's door window
© 2019-2026 Copyright www.tesms.org
