Tesla Model S: Position Sensor - Door - Exterior Handle - Rear - LH (Remove and Replace)
Tesla Model S (2012-2026) Service Manual / Closures / Position Sensor - Door - Exterior Handle - Rear - LH (Remove and Replace)
Removal
- Remove door handle for access (refer to procedure)
- Remove door handle rear seal.
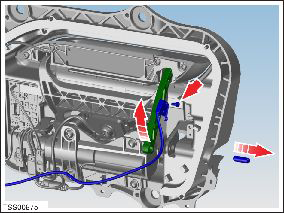
- Remove control link pivot pin to allow control link to be
released from housing.

- Position control link and remove screw securing position sensor to link (torque 1 Nm).
- Remove screw securing position sensor to housing (torque 1.5 Nm).
- Release position sensor wiring and remove position sensor assembly.
- Remove screw securing position sensor to bracket and remove bracket (torque 1 Nm).
- Installation procedure is the reverse of removal, except for the following.
- Install the bracket to position sensor and secure with screw. Ensure the sensor dowel is correctly aligned to the bracket.
- Install and align position sensors and harness to housing and control link. Align position sensor dowels and fit screws.
- Align control link to housing and fit pivot pin.
- Position all wiring around housing and secure with cable ties.
READ NEXT:
 Fork and Control Link - Door - Exterior Handle - Front - LH (Remove and
Replace)
Removal
Remove Door Motor (refer to procedure)
Remove Door Grip (refer to procedure)
Remove press sensor screw.
Rel
 Fork and Control Link - Door - Exterior Handle - Rear - LH (Remove and
Replace)
Removal
Remove Door Motor (refer to procedure)
Remove Door Grip (refer to procedure)
Remove press sensor screw.
Rel
SEE MORE:
 Keep Climate On, Dog, and Camp
The Keep Climate On, Dog, and Camp settings allow you
to keep the climate control system running when in Park,
even after you've left Model S or choose to stay inside
the vehicle. These settings are useful when it is
important to maintain the cabin temperature in hot or
cold weather conditions.
 Headliner - Panoramic Roof (Remove and Install)
Note: This procedure does not remove the headliner from
vehicle; the headliner remains inside the vehicle cabin supported by
the tops of the seats.
Removal
Remove the LH A-pillar trim (refer to procedure).
Remove the RH A-pillar trim.
Release the LH upper B-pillar trim
© 2019-2026 Copyright www.tesms.org

