Tesla Model S: Reservoir - Master Cylinder (Remove and Replace)
Tesla Model S (2012-2026) Service Manual / Brakes / Reservoir - Master Cylinder (Remove and Replace)
Removal
- Remove the master cylinder and reservoir assembly (refer to procedure).
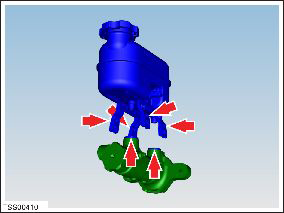
- Release the reservoir to master cylinder fixing lugs (x4).
- Release the reservoir from the master cylinder connections (x2). Note: Place suitable absorbent material around the affected area to absorb any possible fluid spillage.
-
Remove and discard the seals (x2) from the
master cylinder.
Caution: Replace the master cylinder seals.
Installation procedure is the reverse of removal, except for the following:
Warning: Only use cleaning agents and solvents in a well-ventilated area.
Note: Clean the affected areas before installation. Bleed the brakes (refer to procedure).
READ NEXT:
 Brake Lines - Booster to ABS (Dual Motor) (RHD) (Remove and Replace)
Removal
Recover the A/C refrigerant from the vehicle
(refer to procedure).
Remove the 12V battery bracket beam
(refer to procedure).
Release the fasteners (x2) that
Rear Park Brake Caliper Release
Caution: This method
requires replacing the caliper. To release a stuck caliper without
damaging it, refer to either:
Park Brake Caliper - Release - Harness Tool - Through Calipe
Park Brake Caliper - Release - Harness Tool - Through Calipers
Special Tools Required:
1030924-00-A EPB RELEASE TOOL, HARNESS
1030925-00-A ASY, RELEASE TOOL, EPB CONTROLLER REWORK
Perform this procedure on both sides of the vehic
SEE MORE:
Frame - Panoramic Roof Assembly (Remove and Replace) -
Removal
Warning: To avoid
personal injury, wear cut-resistant gloves when performing this
operation.
Special tools required for this procedure:
Supplier
Part Number
Description
Media Control Unit - Touch Screen (Remove and Install)
Special tool required for this procedure:
Supplier
Part Number
Description
Tesla
1065660-00-A
ESD FOAM CONTAINER FOR MEDIA
CONTROL UNIT
Remov
© 2019-2026 Copyright www.tesms.org
