Tesla Model S: Press Sensor - Door - Exterior Handle - Rear - LH (Remove and Replace)
Tesla Model S (2012-2026) Service Manual / Closures / Press Sensor - Door - Exterior Handle - Rear - LH (Remove and Replace)
Removal
- Remove door handle for access (refer to procedure)
- Position handle assembly on a soft working surface.
- Remove door handle rear seal.
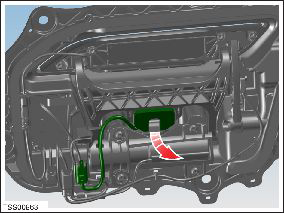
- Remove cable ties securing door pressure sensor and motor wiring.
- Remove press sensor screw.
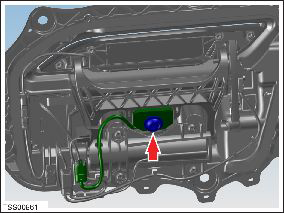
- Release door press sensor wiring connector.
- Using a suitable flat blade, release double sided tape and
remove the sensor from the fork.
- Installation procedure is the reverse of removal, except for the following.
- Clean mating face of fork
- Remove backing tape from sensor and attach to fork.
- Install door press sensor fixing screw engaging the first ten threads.
READ NEXT:
 Position Sensor - Door - Exterior Handle - Front - LH (Remove and Replace)
Removal
Remove door handle for access (refer to procedure)
Remove door handle rear seal.
Remove control link pivot pin to allow control link to be
released from housing.
Posit
Position Sensor - Door - Exterior Handle - Rear - LH (Remove and Replace)
Removal
Remove door handle for access (refer to procedure)
Remove door handle rear seal.
Remove control link pivot pin to allow control link to be
released from housing.
Fork and Control Link - Door - Exterior Handle - Front - LH (Remove and
Replace)
Removal
Remove Door Motor (refer to procedure)
Remove Door Grip (refer to procedure)
Remove press sensor screw.
Rel
SEE MORE:
After Driving
Leave Model S plugged in when not in use. This uses the
charging system, rather than the Battery itself, to keep
the Battery warm (see High Voltage Battery Information).
Scheduled Departure
When parked, plug in Model S and use the Schedule
settings, available on both the charging and climate
con
Mount - Front Drive Unit - LH (Adjust)
Note: This procedure assumes that the RH mount has been
replaced, but that the shim tools cannot be repositioned to verify
proper clearance. If this happens, follow this procedure to adjust
the LH side motor mount.
Release the 2 bolts that secure the 4-way valve bracket to the body.
© 2019-2026 Copyright www.tesms.org
