Tesla Model S: Brake Lines - Booster to ABS (Dual Motor) (RHD) (Remove and Replace)
Tesla Model S (2012-2026) Service Manual / Brakes / Brake Lines - Booster to ABS (Dual Motor) (RHD) (Remove and Replace)
Removal
- Recover the A/C refrigerant from the vehicle (refer to procedure).
- Remove the 12V battery bracket beam (refer to procedure).
-
Release the fasteners (x2) that secure the fuse
box to the front crossmember (torque 6 Nm).
- Release the clip that secures the wheel speed sensor harness, then remove the nut that secures the high pressure A/C pipe to the body.
-
Release the bolts (x4) that secure the coolant
reservoir to the front crossmember (torque 6 Nm). Do not remove the
reservoir at this time.
.png)
-
Carefully lift up the coolant reservoir and
disconnect the coolant level sensor harness.
.png)
- Release all clips that secure the coolant hose to the bottom of the front crossmember.
- Release the clip that secures the RH body harness to the bottom of the front crossmember.
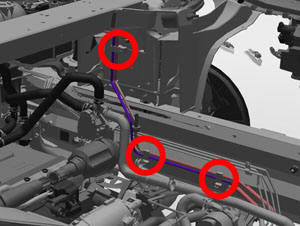
-
Release the nut that secures the front drive
unit ground stap to the body (torque 6 Nm), then release the clip
that secures the intelligent battery sensor (IBS) harness to the
body.
- Release the clip that secures the 4-way valve hose to the body.
- Disconnect the harness from coolant pump 1, then slide the pump outboard to remove it from the subframe. Move the pump out of the way to gain acccess to the brake lines. Note: The coolant hoses do not need to be disconnected from the pump.
-
Remove the bolt that secures the A/C pipe
bracket to the cross-brace (torque 6 Nm).
.png)
-
Remove the bolts (x2) that secrure the TXV to
evaporator (torque 6 Nm).
.png)
- Remove the nut that secures the high pressure A/C pipe to the compressor (torque 10 Nm). Release the pipe and remove the seal. Plug the hole. Caution: The hole must be plugged to prevent contamination. Caution: Remove and discard O-rings.
- Remove the brake fluid from the reservoir.
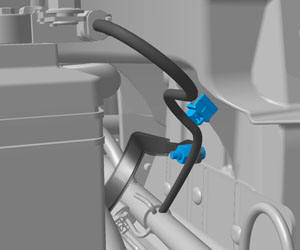
-
Release the clips (x3) that secure the brake
lines to the LH frame rail.
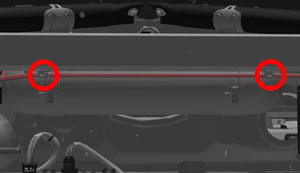
-
Release the clips (x2) that secure the brake
lines to the front crossmember.
- Place suitable absorbent material underneath the ABS module and brake lines.
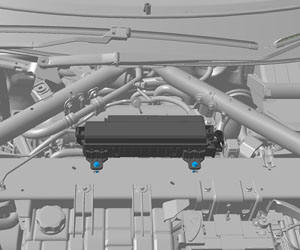
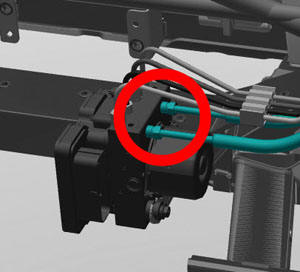
-
Release the front brake lines from the ABS
module (torque 23 Nm).
Caution: If brake fluid is spilled on a painted surface, wash off immediately with clean water.
- Plug the brake line connections to prevent contamination.
- Place suitable absorbent material underneath the booster and brake lines.
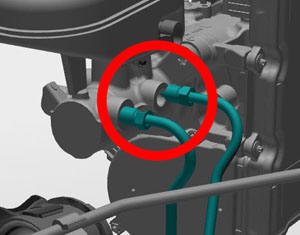
-
Release the front brake lines from the booster
(torque 18 Nm).
Caution: If brake fluid is spilled on a painted surface, wash off immediately with clean water.
- Plug the brake line connections to prevent ingress of moisture or dirt.
- Remove the brake line bundle from the vehicle.
Installation procedure is the reverse of removal, except for the following:
- Recharge the A/C refrigerant system (refer to procedure).
- Perform the brake bleed procedure (refer to procedure).
READ NEXT:
 Rear Park Brake Caliper Release
Caution: This method
requires replacing the caliper. To release a stuck caliper without
damaging it, refer to either:
Park Brake Caliper - Release - Harness Tool - Through Calipe
Park Brake Caliper - Release - Harness Tool - Through Calipers
Special Tools Required:
1030924-00-A EPB RELEASE TOOL, HARNESS
1030925-00-A ASY, RELEASE TOOL, EPB CONTROLLER REWORK
Perform this procedure on both sides of the vehic
Park Brake Caliper - Release - Harness Tool - Through ECU
Special Tools Required:
1030924-00-A EPB RELEASE TOOL, HARNESS
1030925-00-A ASY, RELEASE TOOL, EPB CONTROLLER REWORK
Chock the front wheels.
Remove the RH rea
SEE MORE:
Using Dashcam
Dashcam records footage of your vehicle's surroundings
when the touchscreen is powered on (see Starting and
Powering Off). Dashcam does not record
video when your vehicle is powered off. Use Dashcam to
record driving incidents, such as a collision.
Dashcam requires a properly formatted USB flas
Limitations and Inaccuracies
Collision Avoidance features cannot always detect all
objects, vehicles, bikes, or pedestrians, and you may
experience unnecessary, inaccurate, invalid, or missed
warnings for many reasons, particularly if:
The road has sharp curves.
Visibility is poor (due to heavy rain, snow, fog, etc.).
Br
© 2019-2026 Copyright www.tesms.org
