Tesla Model S: Seal - Door Front Inner Belt - LH (Remove and Replace)
Tesla Model S (2012-2026) Service Manual / Closures / Seal - Door Front Inner Belt - LH (Remove and Replace)
Removal
- Lower door glass.
- Remove door trim panel (refer to procedure)
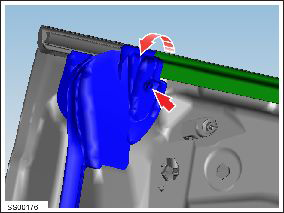
- Remove trim stud securing flap seal to door.
- Carefully ease flap seal clear of inner belt seal for access.
Caution: Take care not to damage component(s).
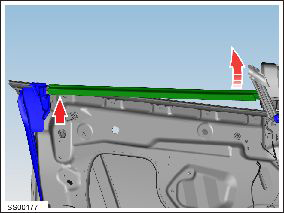
- Starting from mirror end, carefully lift and remove door glass
seal.
Installation procedure is the reverse of removal.
READ NEXT:
 Seal - Belt - Door Inner - Rear - LH (Remove and Replace)
Removal
Lower door glass.
Remove door trim panel (refer to procedure)
Release trim studs (x2) securing flap seal to door.
Carefully ease flap seals clear of inner belt seal for ac
Seal - Door Rear Outer Belt - LH (Remove and Replace)
Removal
Lower window glass.
Using a suitable tool release outer belt seal, release leading
edge and work rearward.
Caution: Protect paintwork from possible damage during
Seal - Sliding Glass - Panoramic Roof (Remove and Replace)
Removal
Remove the sliding roof glass (refer to procedure) .
Release the rear ends of the main seal from beneath the stop
bumper seal.
SEE MORE:
Dashcam and Sentry Mode
NOTE: Depending on market region, vehicle
configuration, options purchased, and software version,
your vehicle may not be equipped with Dashcam or
Sentry Mode or the features may not operate exactly as
described. Please note it is your sole responsibility to
consult and comply with all local re
Motor - Sunroof - LH (Remove and Replace)
Removal
If the vehicle is equipped with premium audio,
remove the premium boost amplifier module
(refer to procedure).
Disconnect the sunroof motor harness connector.
Remove the screws (x3) that secure sunroof
motor to the dash frame (torque 5 Nm).
© 2019-2026 Copyright www.tesms.org
