Tesla Model S: Seal - Sliding Glass - Panoramic Roof (Remove and Replace)
Tesla Model S (2012-2026) Service Manual / Closures / Seal - Sliding Glass - Panoramic Roof (Remove and Replace)
Removal
- Remove the sliding roof glass (refer to procedure) .
- Release the rear ends of the main seal from beneath the stop
bumper seal.
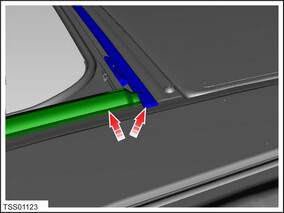
- Carefully release the sealant bond from the body.
- Remove the seal.
- Use an alcohol wipe to fully clean all residual adhesive from the body. Allow the body to fully dry before continuing.
- Apply 3M Primer 94 to the body.
- Apply 3M 4298UV adhesion promoter to the to the main seal adhesive.
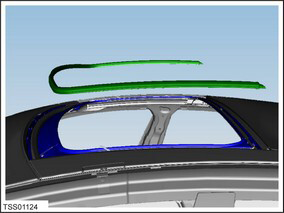
- Install the seal onto the frame; firrmly press down on the seal
to ensure that is it secure.
Caution: Ensure that there are no gaps between the seal and the frame.
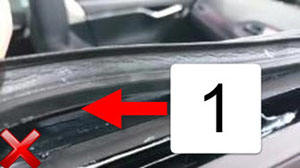
1 Gap between seal and frame
READ NEXT:
 Wheel Arch Liner - Upper - Front - LH (Remove and Replace)
Warning: If the vehicle has air suspension, activate "Jack"
mode on the touchscreen before raising and supporting the vehicle.
Removal
Raise and support the vehicle (refer to pro
Wheel Arch Liner - Rear - LH (Remove and Replace)
Warning: If the vehicle has air suspension, activate "Jack"
mode on the touchscreen before raising and supporting the vehicle.
Removal
Raise and support the vehicle (refer to pro
SEE MORE:
Back Plate - Door - Exterior Handle - Front - LH (Remove and Replace)
Removal
Remove door handle for access (refer to procedure)
Position handle assembly on a soft working surface.
Remove door handle rear seal.
Remove screws (x4) securing handle grip backplate and remove
(torque 2 Nm).
Bleed Procedure - One Caliper (Remove and Replace)
Warning:
If the 12V power supply is disconnected, do not attempt to open
any doors with door glass in closed position. Failure to follow
this instruction could result in door glass shatter.
Note: Before
disconnecting the 12V power supply, ensure that the driver's
door w
© 2019-2026 Copyright www.tesms.org
