Tesla Model S: Seal - Door- Front - Rocker - LH (Remove and Replace)
Tesla Model S (2012-2026) Service Manual / Closures / Seal - Door- Front - Rocker - LH (Remove and Replace)
Warning: If the vehicle has air suspension, activate "Jack" mode on the touchscreen before raising and supporting the vehicle. Removal
- Raise and support the vehicle (refer to procedure)
- Open door.
- Carefully release clips (x11) securing lower seal to door
assembly.
Warning: To avoid personal injury, eye protection must be worn when performing this operation.
Caution: Take care not to damage component(s).
Note: Components have been removed in this graphic to aid clarity.
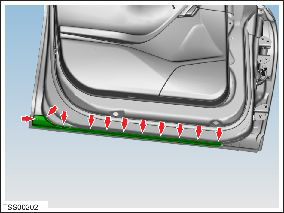
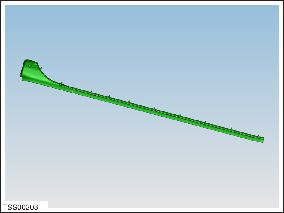
- Remove lower door seal.
Installation procedure is the reverse of removal.
Note: Clean the affected areas before installation.
READ NEXT:
 Seal - Door - Front - LH (Remove and Replace)
Removal
Remove door trim (refer to procedure)
Release clips (x4) securing flap seal ends front and rear.
Note: Components have been removed in this graphic
Seal - Door - Rear - C Pillar - Margin - LH (Remove and Replace)
Removal
Remove door trim (refer to procedure)
Release clips (x3) securing flap seal end to door.
Note: Components have been removed in this
graphic to aid
Seal - Rear Door - LH (Remove and Replace)
Removal
Remove door trim (refer to procedure)
Release clips (x2) securing flap seal end to door.
Note: Components have been removed in this graphic
to aid
SEE MORE:
Speed Assist
How Speed Assist Works
Model S displays a speed limit on the instrument panel
and you can choose if and how you are warned when
you exceed the speed limit. Also, instead of using the
detected speed limit, you can base warnings on an
arbitrary speed limit that you enter manually.
In situations w
HV Battery Blanket (Remove and Replace)
Special tool required for this procedure:
Supplier
Part Number
Description
Bosch
223-MR05029-TSL
Ergonomic Silicone Seam Roller
Removal
R
© 2019-2026 Copyright www.tesms.org
