Tesla Model S: Seal - Door - Front - LH (Remove and Replace)
Tesla Model S (2012-2026) Service Manual / Closures / Seal - Door - Front - LH (Remove and Replace)
Removal
- Remove door trim (refer to procedure)
- Release clips (x4) securing flap seal ends front and rear. Note: Components have been removed in this graphic to aid clarity. Caution: Take care not to damage component(s).
- Carefully release remaining clips (x19).
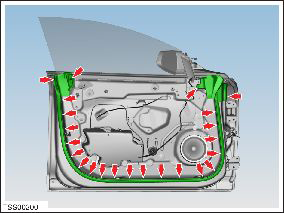
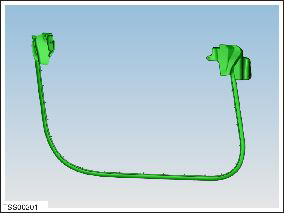
- Remove door seal.
READ NEXT:
 Seal - Door - Rear - C Pillar - Margin - LH (Remove and Replace)
Removal
Remove door trim (refer to procedure)
Release clips (x3) securing flap seal end to door.
Note: Components have been removed in this
graphic to aid
Seal - Rear Door - LH (Remove and Replace)
Removal
Remove door trim (refer to procedure)
Release clips (x2) securing flap seal end to door.
Note: Components have been removed in this graphic
to aid
Seal - Hood (Remove and Replace)
Removal
Open the luggage compartment.
Release the seal from luggage compartment surround.
Note: Components have been removed in this
graphic to aid clarity
SEE MORE:
Coolant Heater - Electric - Battery - 2nd Generation (Remove and Replace)
Warning: Only technicians who have been trained in High
Voltage Awareness are permitted to perform this procedure. Proper
personal protective equipment (PPE) and insulating HV gloves with a
minimum rating of class 00 (500V) must be worn any time a high
voltage cable is handled. Refer
Module - Body Controller - BCM (RHD) (Remove and Replace)
Removal
Remove the active suspension ECU (refer to procedure).
Remove the RH center console closeout extension (refer to
procedure).
Remove the RH footwell cover (refer to procedure).
Place a rag under the HVAC drain hose to catch any remaining
fluid.
Twist the hose
© 2019-2026 Copyright www.tesms.org
