Tesla Model S: Seal - Door - Rear - C Pillar - Margin - LH (Remove and Replace)
Tesla Model S (2012-2026) Service Manual / Closures / Seal - Door - Rear - C Pillar - Margin - LH (Remove and Replace)
Removal
- Remove door trim (refer to procedure)
- Release clips (x3) securing flap seal end to door. Note: Components have been removed in this graphic to aid clarity. Caution: Take care not to damage component(s).
- Carefully release remaining clips (x13).
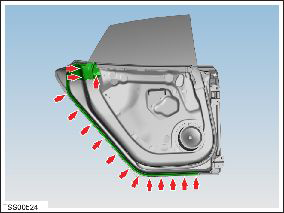
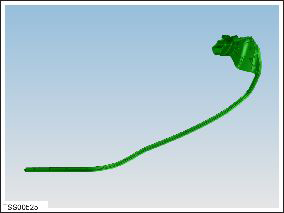
- Remove door seal.
Installation procedure is the reverse of removal.
Note: Clean the affected areas before installation.
READ NEXT:
 Seal - Rear Door - LH (Remove and Replace)
Removal
Remove door trim (refer to procedure)
Release clips (x2) securing flap seal end to door.
Note: Components have been removed in this graphic
to aid
Seal - Hood (Remove and Replace)
Removal
Open the luggage compartment.
Release the seal from luggage compartment surround.
Note: Components have been removed in this
graphic to aid clarity
Seal - Liftgate (Remove and Replace)
Removal
Open vehicle tailgate.
Release tailgate seal from body and carefully remove.
Note: Components have been removed in this graphic
to aid clarity.
SEE MORE:
Limitations
Many factors can impact the performance of Autopilot
components, causing them to be unable to function as
intended. These include (but are not limited to):
Poor visibility (due to heavy rain, snow, fog, etc.).
Bright light (due to oncoming headlights, direct
sunlight, etc.).
Damage or obstru
Motor - Sunroof - RH (Remove and Replace)
Removal
Remove glove box assembly
(refer to procedure)
Disconnect sunroof motor harness connector.
Remove screws (x3) securing sunroof motor to
'A' post (torque 5 Nm).
Release sunroof motor assembly and disconnect
© 2019-2026 Copyright www.tesms.org
