Tesla Model S: Wheel Arch Liner - Rear - LH (Remove and Replace)
Tesla Model S (2012-2026) Service Manual / Exterior fittings / Wheel Arch Liner - Rear - LH (Remove and Replace)
Warning: If the vehicle has air suspension, activate "Jack" mode on the touchscreen before raising and supporting the vehicle.
Removal
- Raise and support the vehicle (refer to procedure)
- Remove road wheel (refer to procedure)
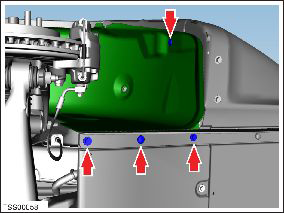
- Remove bolts (x2), plastic rivets (x2) securing rear wheel arch
liner to rear bumper and rear undershield (torque 4 Nm).

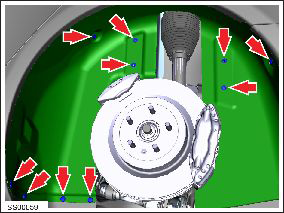
- Remove plastic rivets (x8), nuts (x2) securing rear wheel arch
liner to chassis (torque 3 Nm).

- Remove wheel arch liner.
Installation procedure is the reverse of removal.
READ NEXT:
 Wheel Arch Liner - Lower - Front - LH (Remove and Replace)
Warning: If the vehicle has air suspension, activate "Jack"
mode on the touchscreen before raising and supporting the vehicle.
Removal
Raise and support the vehicle (refer to pro
 Panel - Aero Shield - Front (Remove and Replace)
Warning: If the vehicle has air suspension, activate "Jack"
mode on the touchscreen before raising and supporting the vehicle.
Removal
Raise and support the vehicle (refer to pro
 Panel - Aero Shield - Mid (Remove and Replace)
Removal
Remove the LH diffuser tray rails (refer to procedure).
Repeat step 1 for the RH diffuser tray rails.
Remove the bolts (x9) that secure the mid aero shield panel to
the bo
SEE MORE:
 Fascia Assembly - Front (Remove and Replace)
Removal
Remove the front fascia (refer to procedure).
Remove the front fascia applique:
If the vehicle has the 1st generation front fascia applique,
refer to procedure.
If the vehicle has the 2nd generation front fascia applique,
refer to procedure.
 Latch - Hood - Secondary (RWD) (Remove and Replace)
Removal
Remove the front underhood apron (refer to procedure).
Remove the bolts (x2) that secure the secondary latch to the
crossmember (torque 10 Nm).
Caution: Care must be taken to avoid fasteners falling into
open cavity.
© 2019-2026 Copyright www.tesms.org

