Tesla Model S: Steering Column (Remove and Replace)
Tesla Model S (2012-2026) Service Manual / Steering / Steering Column (Remove and Replace)
Removal
- Ensure that the front road wheels are in a straight ahead position.
- Remove the driver's side lower dash trim (refer to procedure).
- Remove the steering controller module (refer to procedure).
- Disconnect the steering column motor harness connectors (x2).
Caution: Take care not to damage component(s).
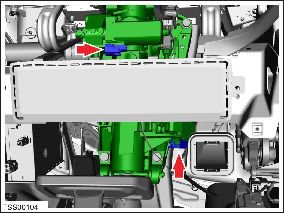
- Mark the lower shaft position relative to the column.
- Remove the bolt that secures the lower shaft to the steering
column (torque 30 Nm).
.png)
- Remove the bolts (x4) that secure the steering column to the
mounting bracket (torque 26 Nm).
.png)
- Release the steering column from the lower shaft and remove the steering column from the vehicle.
- Installation procedure is the reverse of removal, except for the following: Caution: Replace all nylon-insert locknuts.
- Ensure that the lower shaft to column marking aligns correctly.
- Connect a laptop with Toolbox 2.0 to the vehicle.
- In Toolbox, select Panels > Steering > Power Steering (EPAS) Control. Reset the power steering calibration.
Note: After recalibrating the power steering, drive the vehicle for a minimum of 5 minutes before returning the vehicle to the customer.
READ NEXT:
 Brake Rotor - Front - LH (Remove and Replace)
Warning: If the vehicle
has air suspension, activate "Jack" mode on the touchscreen before
raising and supporting the vehicle.
Special tool(s) required for this procedure:
Brake Rotor - Rear - LH (Remove and Replace)
Warning: If the vehicle
has air suspension, activate "Jack" mode on the touchscreen before
raising and supporting the vehicle.
Special tool(s) required for this procedure:
SEE MORE:
Door Mirror Assembly - LH (Remove)
Removal
Lower the front window glass.
Remove the door trim panel (refer to procedure).
Carefully release the clips (x2) that secure the front top end
of the flap seal to the door.
Release enough of the flap seal to access the mirror retaining
bolts.
Caution:
Hub - Rear - LH (Remove and Replace)
Special tool(s) required for this procedure:
Supplier
Part Number
Description
Tesla
1062500-00-A
Magnetic Field Viewing Card
Tesla
1082171-00-A
S-hook
Warning: If
© 2019-2026 Copyright www.tesms.org
