Tesla Model S: Brake Rotor - Front - LH (Remove and Replace)
Warning: If the vehicle has air suspension, activate "Jack" mode on the touchscreen before raising and supporting the vehicle.
Special tool(s) required for this procedure:
| Supplier | Part Number | Description |
| Tesla | 1082171-00-A | S-hook |
- Remove the road wheel (refer to procedure).
- If the brake pads are being replaced, remove them from the caliper (refer to procedure). Note: If the pads are not being replaced, continue this procedure.
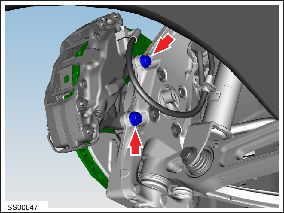
- Note the orientation of the clip that secures the brake hose to the suspension spring module. Release the clip.
-
Remove the bolts (x2) that secure the caliper
to the knuckle (torque 120 Nm).
- Release the caliper and use the S-hook to support it.
-
Remove the screw that secures the rotor to the
hub (torque 17 Nm).
.png)
- Remove the rotor.
Installation procedure is the reverse of removal, except for the following:
Note: Clean the affected areas before installation.
Caution: Ensure brake hose is aligned correctly with no excessive twist or bends.
-
Ensure that the clip that secures the brake
hose to the air spring module is installed correctly.
-
Rear wheel drive (RWD) vehicles:
The hose and the clip are installed from the same direction.
Note: Ensure that the clip is fully seated, with the "fingers" both remaining on the bottom side of the retaining bracket.
.png)
Top view, RWD (correct).png)
Bottom view, RWD (correct) -
Dual motor (DM) vehicles: The clip
is installed from the rear.
Note: Ensure that the clip is fully seated, with the "fingers" both remaining on the bottom side of the retaining bracket.

Top view, DM (incorrect)
Top view, DM (correct)
Bottom view, DM (correct)
-
Rear wheel drive (RWD) vehicles:
The hose and the clip are installed from the same direction.
- Pump the brake pedal at least 5 times to seat the pads against the brake rotor.
Warning: Always check that the brake pads are seated correctly before driving the vehicle.
READ NEXT:
 Brake Rotor - Rear - LH (Remove and Replace)
Warning: If the vehicle
has air suspension, activate "Jack" mode on the touchscreen before
raising and supporting the vehicle.
Special tool(s) required for this procedure:
Brake Caliper - Front - LH (Remove and Replace)
Warning: If
the vehicle has air suspension, activate "Jack" mode on the
touchscreen before raising and supporting the vehicle.
Removal
Remove the rear underhood apron
Brake Caliper - Rear - LH (Remove and Replace)
Warning: If the vehicle
has air suspension, activate "Jack" mode on the touchscreen before
raising and supporting the vehicle.
Removal
Remove the rear underhood apron
SEE MORE:
Removing the Maintenance Panel
To check fluid levels, remove the maintenance panel:
1. Open the hood.
2. Pull the maintenance panel upward to release the
clips that hold it in place.
CAUTION: The maintenance panel protects the
front trunk from water. When re-attaching, make
sure it is fully seated.
Checking Battery Cool
Carpet - Interior Complete (Remove and Replace)
Removal
Remove driver seat (refer to procedure)
Remove passenger seat.
Remove driver footrest (refer to procedure)
Remove LH sill panel trim (refer to procedure)
Remove RH sill panel trim.
Remove rear seat cushion (refer to procedure)
Loosen bolts (x2) securing front
