Tesla Model S: Strut - Shock Tower to Bulkhead - LH (Remove and Replace)
Tesla Model S (2012-2026) Service Manual / Body / Strut - Shock Tower to Bulkhead - LH (Remove and Replace)
Removal
- Ensure that the wipers are in the off position by rotating the end of the left-hand steering column lever towards the rear of the vehicle.
- Open the hood to the service position.
- Remove both wiper arms (refer to procedure).
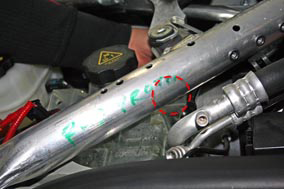
- Remove the bolts (x2) that secure the LH strut brace to the shock tower (torque 20 Nm).
- Remove the clip that secures the cowl screen to the LH strut
brace (torque 20 Nm).
Note: RHD vehicles have an additional bolt securing the coolant reservoir to the underside of the strut brace (torque 5 Nm). Remove this before proceeding.
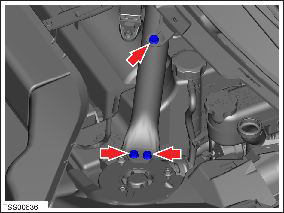
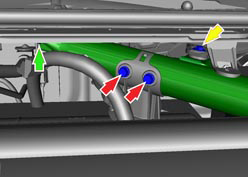
- Remove the bolts (x2) that secure the air suspension reservoir to the LH strut brace (red arrows) (torque 25 Nm).
- Remove the bolt that secures the wiper motor assembly to the LH strut brace (yellow arrow) (torque 6 Nm).
- Remove the bolt that secures the LH strut brace to the bulkhead
(green arrow) (torque 30 Nm).
Caution: Remove the clip carefully.
- Release the clip that secures the wiring harness to the LH strut.
- Remove the LH strut brace.
Installation procedure is the reverse of removal, except for the following:
- Clean the affected areas before installation.
- Ensure that the wipers are set back to the Auto position by rotating the end of the left-hand steering column lever towards the front of the vehicle.
READ NEXT:
 Windshield Assembly (Remove and Replace)
Note: Use Dow Betaseal Express or an equivalent fast-curing
glass adhesive to perform this procedure.
Special tool recommended for this procedure:
Supplier
Sensor - Light/Rain (Remove and Replace)
Removal
Remove the rear view mirror trim. (refer to procedure)
Press the spring clip while lifting the corners of the clip to
remove the sensor from the bracket.
Fixed Glass - Front Door - LH (Remove and Replace)
Removal
Remove the front door mirror assembly (refer to procedure).
Carefully release the quarter glass from the seal and frame.
SEE MORE:
Overtake Acceleration
When following a vehicle with Traffic-Aware Cruise
Control active, engaging the turn signal (to indicate a
move into the passing lane) accelerates Model S towards
the vehicle ahead. By momentarily holding the turn
signal, you can quickly accelerate up to your set speed
without having to press t
External charging equipment error detected
Try different charging equipment
AC charging cannot begin due to a condition that prevents your vehicle from
charging with AC power. DC fast
charging / Supercharging should still function as expected.
Your vehicle's onboard charger is detecting input voltage at the charge port
when no power has
© 2019-2026 Copyright www.tesms.org
