Tesla Model S: Door Mirror Assembly - LH (Replace)
Tesla Model S (2012-2026) Service Manual / Exterior fittings / Door Mirror Assembly - LH (Remove and Replace) / Door Mirror Assembly - LH (Replace)
Installation
Installation procedure is the reverse of removal, except for the following:- Inspect the mirror area of the door panel. Install 2 nylon shims
(1026519-00-A) and a strip of black felt tape if they are not
present in the area.
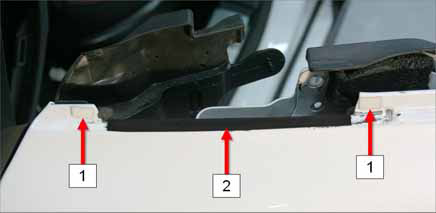
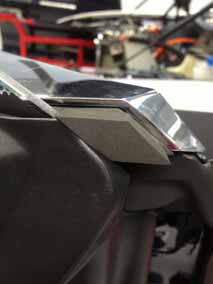
1 Shim 2 Felt tape - From the inside of the vehicle, inspect the diamond-shaped area
immediately in front of the fixed glass. Install the exterior mirror
NVH foam (1022112-00-A) if it is not present in the area.
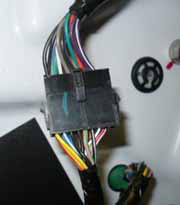
- Check the color of the door harness electrical connector near
the mirror. If the connector is black (on vehicles built before late
May 2013), install the mirror harness adaptor (1025215-00-A).
- Install the door mirror assembly:
Caution: Ensure that the wiring harness connector is inboard of the door.
Caution: Failure to install the fasteners using the following sequence can result in NVH issues.
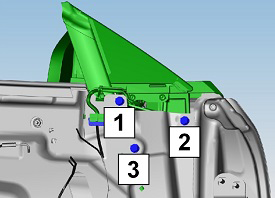
1 Upper bolt 2 Forward bolt 3 Lower bolt - Hand tighten the upper bolt.
- While applying downward pressure on the door mirror assembly, torque the forward bolt (18 Nm).
- While applying downward pressure on the door mirror assembly, torque the upper bolt (18 Nm).
- Torque the lower bolt (18 Nm).
- Carefully align the door glass to the guide rail during final assembly.
- Check for smooth operation of the window glass. Adjust the alignment of the glass if the glass does not operate smoothly.
- Remove the plugs and loosen the nuts (x2) that control the
inboard and outboard adjustment of the glazing, located beneath the
door (torque 10 Nm).
.png)
- Loosen the nut the secures the glass clamp; adjust the glass
fore and aft to achieve the correct alignment (torque 7.5 Nm).
.png)
- Conduct a final operations check, torque the adjustment nuts, and install the plugs to the underside of the door.
READ NEXT:
 Glass - Door Mirror - LH (Remove and Replace)
Warning: To avoid personal injury, eye protection must be
worn when performing this operation.Warning: To avoid personal injury, wear cut-resistant
gloves when performing this operation.
'B' Post Trim Panel - LH (Remove and Replace)
Removal
Open both LH doors.
Remove clips (x2) securing 'B' post finisher to body.
Caution: Protect exterior paint surfaces during this
procedure.
Brightwork - Body side - LH (Remove and Replace)
Removal
Release the top of the front and rear door seals.
Note: Components have been removed in this graphic
to aid clarity.
Note: The following image shows th
SEE MORE:
Drive Cycle Calibration - Forward Facing Camera
Note: If available, calibrate the forward facing camera using
the Camera Calibration Target (refer to procedure).
Note: This procedure describes how to perform a drive cycle
calibration on the forward facing camera. It does not apply to the rear
facing camera.
Connect a laptop with To
Switch - Window Lift - LH - Rear (Remove and Replace)
Removal
Remove LH rear door panel (refer to procedure)
Move acoustic pad aside to access door trim.
Caution: Take care not to damage component(s).
Remove screws (x3) securing window lift switch surround
© 2019-2026 Copyright www.tesms.org
