Tesla Model S: 2nd Row Center Console Assembly (Remove and Replace)
Tesla Model S (2012-2026) Service Manual / Interior trim / 2nd Row Center Console Assembly (Remove and Replace)
Removal
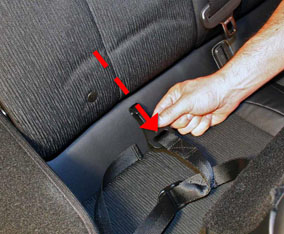
- Fold the RH 2nd row back rest.
- Loosen the 2nd row center console tether strap behind the center seat.
- Unclip the tether latch from the child seat anchor.
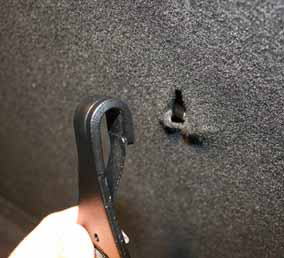
- Pull the tether out between the seat and the back rest to the
front.
- Remove the console from the vehicle.
- Raise the RH rear seat back.
Installation procedure is the reverse of removal.
READ NEXT:
 Center Console - 2nd Row - Executive (Remove and Replace)
Removal
Move both front seats all the way forward.
Remove the felt tray from the console.
Remove the rubber padding from the base of the console and
cupholders.
Release the sc
Finisher - Floor - Center Console (Remove and Replace)
Special tool required for this procedure:
Supplier
Part Number
Description
Headlining (Remove and Install)
Note: This procedure does not remove headlining from
vehicle, the headlining remains captive within the body.
Removal
Remove LH 'A' post trim (refer to procedure)
Remove RH '
SEE MORE:
Mobile Connector to adapter connection hot
Maximum charge rate reduced
Charge current has been reduced because the Mobile Connector has detected a
high temperature at the connection
between the wall plug adapter and the control box.
Make sure the wall plug adapter is fully connected to the Mobile Connector
control box.
After unplugging
Cooling System - Vacuum Refill
Note: Make sure at least 14 L of the specified coolant is
available before beginning this procedure.
Caution: Use the specified coolant only. In this manual, refer
to General Information > Capacities, Fluids, and Lubricants >
Fluids.
Refill
Use Toolbox to prep
© 2019-2026 Copyright www.tesms.org
