Tesla Model S: Actuator - Defrost (Remove and Replace)
Tesla Model S (2012-2026) Service Manual / Thermal Management / Actuator - Defrost (Remove and Replace)
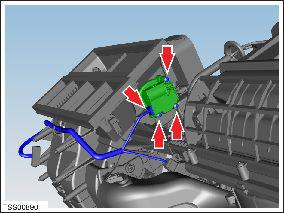
Removal
- Remove glove box assembly (refer to procedure)
- Disconnect actuator harness connector.
- Remove screws (x3) securing defrost door actuator to HVAC assembly (torque 1 Nm).
- Remove actuator.
Caution: Take care not to damage component(s).
Installation procedure is the reverse of removal, except for the following:
READ NEXT:
 Motor - Fan assembly - HVAC (Remove and Replace)
Removal
Power the passenger seat fully rearward for access.
Remove the passenger footwell closing trim (refer to procedure).
Disconnect the fan harness connector and position the
Hose - HVAC - Drain (Remove and Replace)
Removal
Remove the LH closeout extension assembly (refer to procedure).
Note: For vehicles built with the cold weather
package between May 31, 2013 and July 11
Hose - Front HVAC - Drain (Dual Motor) (Remove and Replace)
Remove
Perform the electrical isolation procedure (refer to procedure).
Remove the RH steering brace:
Remove the bolt that secures the steering brace to
SEE MORE:
Sensor - Impact - C Pillar (Remove and Replace)
Removal
Remove sill panel trim (refer to procedure)
Pull up lower portion of the 'C' post lower trim panel by
releasing the trim clips.
Caution: Take care not to damage component(s).
Caution: Replace any broken clips.
Charging equipment communication lost
Check power source and charging equipment
Charging stopped because communication between the vehicle and the external
charging equipment was
interrupted.
Confirm whether the external charging equipment is powered by looking for any
status lights, displays, or other
indicators on the equipment.
© 2019-2026 Copyright www.tesms.org
