Tesla Model S: IP Carrier (Remove and Replace)
Tesla Model S (2012-2026) Service Manual / Instrument Panels and Pedals / IP Carrier (Remove and Replace)
Warning: If the 12V power supply is disconnected, do not attempt to open any doors with door glass in closed position. Failure to follow this instruction could result in door glass shatter.
Note: Before disconnecting the 12V power supply, ensure that the driver's door window is fully open. Failure to follow this instruction could result in vehicle lockout.
Removal
- Position the vehicle so that both front doors can be fully opened.
- Move the driver's seat fully rearwards.
- Move the passenger's seat fully rearwards.
- Move the steering column to the lowest position, and fully extended.
- Open the glove box.
- Disconnect 12V power.
- Rear wheel drive (RWD): Refer to procedure.
- Dual Motor: Refer to procedure.
- Remove the defrost mesh grille assembly (refer to procedure).
- Remove the MCU/touch screen (refer to procedure).
- Remove the glove box assembly (refer to procedure).
- Ensure that the front wheels are in the straight ahead position.
- Working from the driver's footwell, remove the bolts (x4) that
secure the steering column to the IP carrier bracket (torque 30 Nm).
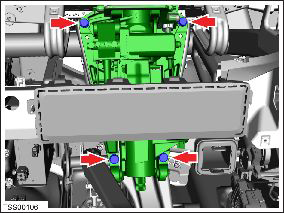
- Remove the screws (x18) that secure the IP carrier to the dash
frame (torque 2 Nm).
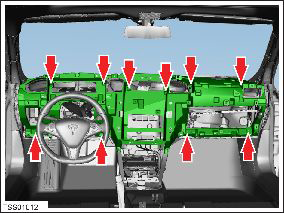
- Remove the IP carrier from the dash frame.
Installation procedure is the reverse of removal, except for the following:
Transfer the speakers to the new IP carrier.
READ NEXT:
 Cross Car Beam (Remove and Replace)
Removal
Remove the IP carrier (refer to procedure).
Remove the center console (refer to procedure).
Remove the nuts (x2) that secure the driver knee airbag. Retain
the washers (x2
Assembly - Frame - Instrument Cluster (Remove and Replace)
Removal
Remove driver side lower dash trim (refer to procedure)
Remove the instrument panel side covers (refer to procedure)
Remove the A-pillar middle trim panels (refer to proce
Trim - Touch Screen Surround (Remove and Replace)
Removal
Remove the MCU/touch screen (refer to procedure).
Remove the screws (x6) that secure the touch screen surround
(torque 4 Nm).
Cut the cable tie that secures the Bluetooth
SEE MORE:
Bleed Procedure - One Caliper (Remove and Replace)
Warning:
If the 12V power supply is disconnected, do not attempt to open
any doors with door glass in closed position. Failure to follow
this instruction could result in door glass shatter.
Note: Before
disconnecting the 12V power supply, ensure that the driver's
door w
Overview
The Media Player displays on the touchscreen and is
used to play various types of media. You can drag Media
Player upward to expand it (allowing you to browse),
and downward to minimize it so that just the Miniplayer
displays. The convenient Miniplayer, which occupies the
least amount of space
© 2019-2026 Copyright www.tesms.org
