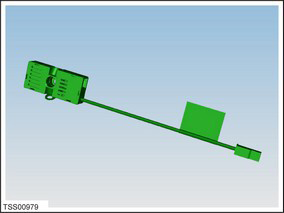
Tesla Model S: Antenna - RF Filter - RH (Remove and Replace)
Removal
- Remove the RH liftgate trim (refer to procedure).
- Remove the screw that secures the RF filter to the liftgate
(torque 1 Nm).
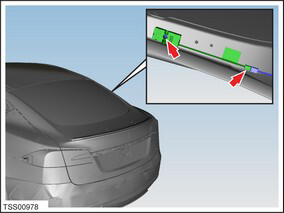
- Remove the RF filter from the vehicle.
Installation procedure is the reverse of removal, except for the following: Replace the adhesive strip if necessary.
Note: Clean the affected areas before installation.
Caution: Apply contact adhesive to mating faces if bond has been broken.
Antenna - AM/FM/RKE (Remove and Replace)
Removal- Remove liftgate glass (refer to procedure)
- AM antenna is part of liftgate glass, if elements are damaged renew liftgate glazing.
Installation procedure is the reverse of removal.
Antenna - FM2 and Defrost Grid (Remove and Replace)
Removal- Remove liftgate glass (refer to procedure)
- DAB and defrost grid are part of liftgate glass, if elements are damaged renew liftgate glazing.
Installation procedure is the reverse of removal.
Antenna - DAB (Remove and Replace)
Removal- Remove liftgate glass (refer to procedure)
- DAB and defrost grid are part of liftgate glass, if elements are damaged renew liftgate glazing.
Installation procedure is the reverse of removal.
READ NEXT:
 Antenna - Satellite Radio - Liftgate-Mounted (Remove and Replace)
Note: This procedure is for vehicles built before December
23, 2014. On newer vehicles, the satellite radio antenna is located
under the panoramic roof fixed glass (refer to procedure).
Re
Antenna - Satellite Radio - Roof-Mounted (Remove and Replace)
Note: This procedure is for vehicles with panoramic roofs
built after December 23, 2014. On older vehicles, the satellite
radio antenna is located under the liftgate glass (refer to
proced
Microphone - Bluetooth (Remove and Replace)
Removal
Release the front of the exterior overhead console and pull
downward.
Caution: Do not damage the harness connections on the
inside of the overhead console.
SEE MORE:
Module - Sunroof Controller (Remove and Replace)
Removal
Remove the body control module (BCM) (refer to procedure)
Remove the 4 bolts and 1 nut that secure the sunroof controller
mounting bracket to the body (torque 8 Nm).
Carefully turn the mounting bracket over.
Cable - Latch - Hood - LH (Dual Motor) (Remove and Replace)
Removal
Remove the underhood storage unit (refer to procedure).
Release the rear cable from the latch assembly.
Note: If performing this procedure on the
RH side, release the front cable.
