Tesla Model S: Speaker - Rear - LH/RH (Remove and Replace)
Tesla Model S (2012-2026) Service Manual / Infotainment / Speaker - Rear - LH/RH (Remove and Replace)
Removal
- Open tailgate to suitable working height.
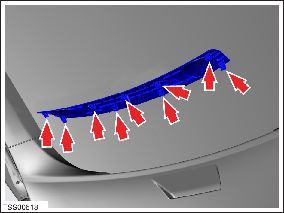
- Carefully release speaker cover clips (x9) from tailgate. Caution: Take care not to damage component(s).
- Remove speaker covers and position aside.
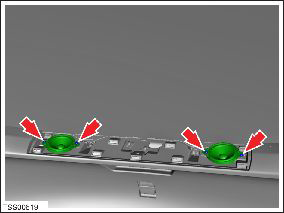
- Remove screws (x4) securing speakers (x2) to tailgate (torque 1
Nm).
- Release speakers and disconnect wiring harness connections (x2).
Note: Mark speaker connectors before disconnecting for identification purposes.
- Remove both speakers.
- Installation procedure is the reverse of removal except for the following
- Inspect and replace speaker screw grommets.
READ NEXT:
 Premium Boost Amplifier (Remove and Replace)
Removal
Release latch, disconnect amplifier harness connector and
position aside.
Caution: Take care not to damage component(s).
Tuner - AM - FM (Remove and Replace)
Note: This procedure applies to both base and premium
tuners (premium pictured).
Removal
Remove the driver side lower dash trim (refer to procedure).
Remove the driver si
Antenna Amplifier - AM/FM and RKE (Remove and Replace)
Removal
Remove the LH liftgate trim (refer to procedure).
Remove the screw that secures the amplifier to the liftgate.
Carefully disconnect the amplifier connector.
Release th
SEE MORE:
Limitations
Autosteer and its associated functions are particularly
unlikely to operate as intended when:
Autosteer is unable to accurately determine lane
markings. For example, lane markings are excessively
worn, have visible previous markings, have been
adjusted due to road construction, are changing
Side Applique - 1st Generation - LH (Remove and Replace)
Warning: To avoid
personal injury, wear cut-resistant gloves when performing this
operation.
Special tools required for this procedure:
Supplier
Part Number
Description
© 2019-2026 Copyright www.tesms.org
