Tesla Model S: Antenna Amplifier - AM/FM and RKE (Remove and Replace)
Tesla Model S (2012-2026) Service Manual / Infotainment / Antenna Amplifier - AM/FM and RKE (Remove and Replace)
Removal
- Remove the LH liftgate trim (refer to procedure).
- Remove the screw that secures the amplifier to the liftgate.
- Carefully disconnect the amplifier connector.
- Release the clip that secures the amplifier to the liftgate.
Note: RH side shown.
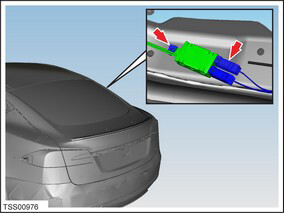
- Carefully release the antenna lead from the glass connectors
(x2) and the adhesive strip that secures the amplifier to the
liftgate glazing antenna.
Note: RH shown.
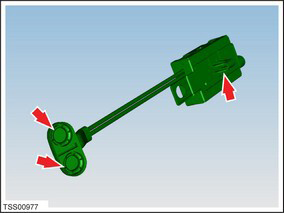
- Remove the component from the vehicle.
Installation procedure is the reverse of removal, except for the following:
- Replace the adhesive strip if necessary. Note: Clean the affected areas before installation. Caution: Apply contact adhesive to mating faces if bond has been broken.
- Ensure all contacts are clean and bond to the surface mounted antenna.
Note: Listen for an audible click when connecting harness connectors.
READ NEXT:
 Antenna - RF Filter - RH (Remove and Replace)
Removal
Remove the RH liftgate trim (refer to procedure).
Remove the screw that secures the RF filter to the liftgate
(torque 1 Nm).
Antenna - Satellite Radio - Liftgate-Mounted (Remove and Replace)
Note: This procedure is for vehicles built before December
23, 2014. On newer vehicles, the satellite radio antenna is located
under the panoramic roof fixed glass (refer to procedure).
Re
Antenna - Satellite Radio - Roof-Mounted (Remove and Replace)
Note: This procedure is for vehicles with panoramic roofs
built after December 23, 2014. On older vehicles, the satellite
radio antenna is located under the liftgate glass (refer to
proced
SEE MORE:
Service is required
Schedule service now
This alert is set remotely by Tesla when a condition requiring service is
detected on your vehicle.
This alert can be set due to various conditions. When you schedule service, more
information should be available.
This alert can only be cleared by a service technician after
Charging stopped - Charge cable disconnected
Close charge port - Press brake pedal and retry
Charging has stopped because your vehicle has detected that the connection
between the charge port and charge
cable has been unexpectedly interrupted.
Before disconnecting a charge cable, make sure you first stop charging.
With some external chargi
© 2019-2026 Copyright www.tesms.org
