Tesla Model S: Antenna - Satellite Radio - Roof-Mounted (Remove and Replace)
Tesla Model S (2012-2026) Service Manual / Infotainment / Antenna - Satellite Radio - Roof-Mounted (Remove and Replace)
Note: This procedure is for vehicles with panoramic roofs built after December 23, 2014. On older vehicles, the satellite radio antenna is located under the liftgate glass (refer to procedure).
Removal
- Remove the panoramic roof fixed glass (refer to procedure).
- Remove the LH and RH C-post upper trim (refer to procedure).
- Pull down the rear of the headliner. Note: Do not remove the headliner completely.
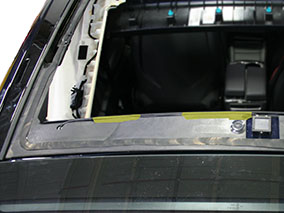
- Remove the electrical tape and cable ties as needed to access
the yellow satellite antenna connector in the electrical harness at
the LH upper C-pillar.

- Disconnect the yellow satellite antenna connector from the electrical harness.
- Cut the antenna electrical harness near the satellite antenna.
Note: Part of this harness is mounted
under the panoramic roof frame. The old harness is
not completely removed during this procedure.
- Use a plastic trim tool or other thin non-abrasive tool to release the satellite antenna from the roof crossmember.
- Remove the satellite antenna.
- Cut the antenna electrical harness near the bottom of the roof crossmember.
- Remove and discard the mounting clips from the electrical harness on the new antenna.
- Remove all adhesive residue from the antenna mounting surface with alcohol wipes. Allow the alcohol to dry fully before continuing.
- Peel the backing material from the bottom of the antenna and
affix the antenna to the mounting surface in the location shown.
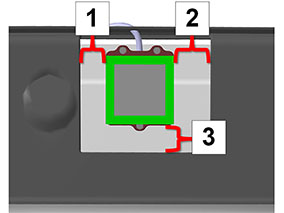
1 13 mm 2 18 mm 3 15 mm - Test-fit the the satellite antenna electrical harness.
- Position material to collect metal shavings below the LH rear roof crossmember.
- Drill a hole with a diameter of at least 15 mm (5/8 in) through
the panoramic roof frame and roof crossmember.
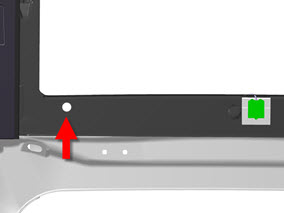
- Deburr the hole.
- Vacuum all metal shavings.
- Route the new satellite antenna harness in the panoramic roof
frame channel and through the hole.
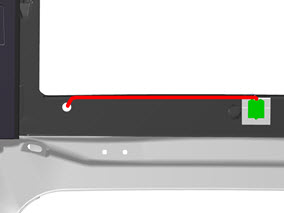
- Connect the antenna connector to the electrical harness at the LH C-post upper. Tip: Wrap the electrical connector with foam tape or felt tape to prevent rattles when the vehicle is reassembled.
- Secure the satellite antenna harness to the panoramic roof frame
with electrical harness tape or similar adhesive tape.
Note: The harness and hole are not exposed to the environment once the panoramic roof fixed glass is installed. No special water-proofing measures are required.
Tape highlighted in yellow
- Reinstall the components that were removed for access.
READ NEXT:
 Microphone - Bluetooth (Remove and Replace)
Removal
Release the front of the exterior overhead console and pull
downward.
Caution: Do not damage the harness connections on the
inside of the overhead console.
Antenna - GPS (Remove and Replace)
Removal
Remove liftgate glazing (refer to procedure)
Disconnect GPS harness connector.
Release GPS antenna from adhesiv
Antenna - GSM - LH (Remove and Replace)
Note: The GSM antenna is a component within the door
mirror assembly. If the GSM antenna develops a fault, the whole
mirror assembly must be replaced.
Removal
Remove the door
SEE MORE:
Steering Rack (RWD) (Remove and Replace) - Installation
Installation
Installation procedure is the reverse of removal, except
for the following:
Caution: Replace all nylon-insert locknuts.
Caution: Replace all Patchbolt(s).
Note: The LH and RH subframe braces are not
interchangeable.
Limited deceleration when accelerator is released
OK to drive - Use brake pedal as needed
Regenerative braking performance is temporarily reduced. The expected amount
of automatic deceleration is not
available when you lift your foot off the accelerator pedal while driving.
Your vehicle is OK to drive.
Use the brake pedal as needed to slow your
© 2019-2026 Copyright www.tesms.org
