Tesla Model S: Antenna - Satellite Radio - Liftgate-Mounted (Remove and Replace)
Tesla Model S (2012-2026) Service Manual / Infotainment / Antenna - Satellite Radio - Liftgate-Mounted (Remove and Replace)
Note: This procedure is for vehicles built before December 23, 2014. On newer vehicles, the satellite radio antenna is located under the panoramic roof fixed glass (refer to procedure).
Removal
- Remove the liftgate glass (refer to procedure).
- Disconnect the XM antenna connector.
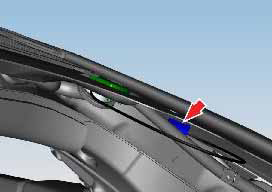
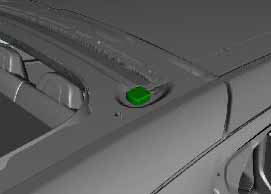
- Release the XM antenna from the adhesive bond.
- Release the wiring harness from the liftgate. Note: Note installed position of components before removal.
- Remove the XM antenna.
Installation
Installation procedure is the reverse of removal.Note: Clean the affected areas before installation.
Caution: Apply contact adhesive to mating faces if bond has been broken.
Warning: Only use cleaning agents and solvents in a well-ventilated area.
READ NEXT:
 Antenna - Satellite Radio - Roof-Mounted (Remove and Replace)
Note: This procedure is for vehicles with panoramic roofs
built after December 23, 2014. On older vehicles, the satellite
radio antenna is located under the liftgate glass (refer to
proced
Microphone - Bluetooth (Remove and Replace)
Removal
Release the front of the exterior overhead console and pull
downward.
Caution: Do not damage the harness connections on the
inside of the overhead console.
Antenna - GPS (Remove and Replace)
Removal
Remove liftgate glazing (refer to procedure)
Disconnect GPS harness connector.
Release GPS antenna from adhesiv
SEE MORE:
Track Mode
Track Mode, available only on Plaid Model S vehicles, is
designed to modify the stability control, traction control,
regenerative braking, and cooling systems to increase
performance and handling while driving on closed
circuit courses. Track Mode improves cornering ability by
intelligently usi
Front Reading (Dome) Lights (Remove and Replace)
Removal and Install
Use a trim stick to remove the front dome light bezels. Discard
the bezels.
Release the screw cover from each sun visor center retaining
block and remove the screw.
© 2019-2026 Copyright www.tesms.org
