Tesla Model S: Assembly - Back Rest - Driver's Seat (Remove and Replace)
Tesla Model S (2012-2026) Service Manual / Seats / Assembly - Back Rest - Driver's Seat (Remove and Replace)
Removal
- Remove driver's seat assembly (refer to procedure)
- Place seat on clean work surface.
- Remove screw securing outer side cover to seat (torque 1 Nm).
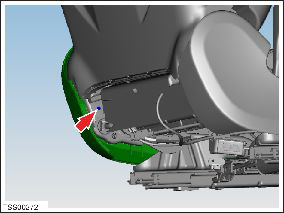
- Carefully release outer side cover from retaining bracket and lay it aside with harnesses still connected.
- Remove outer side cover assembly.
- Remove screw securing inner side cover to seat (torque 1 Nm).
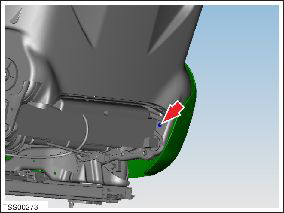
- Carefully release inner side cover from retaining bracket.
- Release clip securing seat harness to cover.
- Remove inner side cover.
- Reposition seat.
- Disconnect seat back rest heater element connector and harness.
- Disconnect seat back lumbar support connector and harness.
- Disconnect side airbag connector and harness.
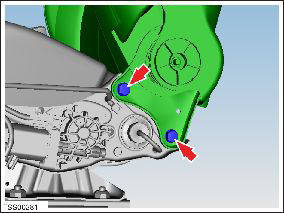
- With assistance, remove bolts (x4) securing seat back rest to
seat base and remove seat back rest assembly and place aside (torque
32 Nm). NOTE: LH bolts shown.
READ NEXT:
 Frame - Seat Base - 2nd Row Cushion (Remove and Replace)
Removal
Remove the seat cushion (refer to procedure).
Remove the LH rear seat back rest assembly (refer to procedure).
Remove the RH rear seat back rest assembly (refer to procedu
Frame - Seat Base - 2nd Row - Executive (Remove and Replace)
Removal
Remove the 2nd row back rest assembly (refer to procedure).
Dual Motor vehicles only: Release the fasteners
(x4) that secure the inline fuse bracket to the seat frame (torque
Frame - Seat Back - 2nd Row Seat - LH (Remove and Replace)
Removal
Remove Rear LH seat back rest assembly and remove Pivot lock
from outboard side of assembly (refer to procedure)
Release and remove latch cover from seat back.
SEE MORE:
Polishing, Touch Up, and Body
Repair
To preserve the cosmetic appearance of the body, you
can occasionally treat the paint surfaces with an
approved polish containing:
Very mild abrasive to remove surface contamination
without removing or damaging the paint.
Filling compounds that fill scratches and reduce their
visibility.
W
Spring and Damper Assembly - Front - LH (Remove and Replace)
Removal
Remove the front road wheel (refer to procedure).
Lower the vehicle.
Remove the underhood apron (refer to procedure).
Remove the nuts (x3) that secure the coil spring module top
mounting (torque 39 Nm).
© 2019-2026 Copyright www.tesms.org
