Tesla Model S: Frame - Seat Base - 2nd Row Cushion (Remove and Replace)
Tesla Model S (2012-2026) Service Manual / Seats / Frame - Seat Base - 2nd Row Cushion (Remove and Replace)
Removal
- Remove the seat cushion (refer to procedure).
- Remove the LH rear seat back rest assembly (refer to procedure).
- Remove the RH rear seat back rest assembly (refer to procedure).
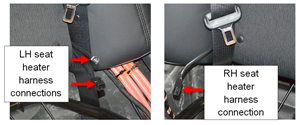
- If the vehicle is equipped with the Subzero Weather package,
disconnect the 2 seat heater harness connections on the LH side of
the vehicle and the 1 seat heater harness connection on the RH side
of the vehicle.
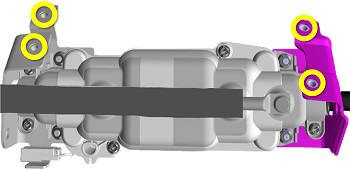
- Dual Motor vehicles only: Release the fasteners
(x4) that secure the inline fuse bracket to the seat frame (torque 5
Nm).
- Remove the bolts (x8) that secure the seat frame to the body
(torque 26 Nm).
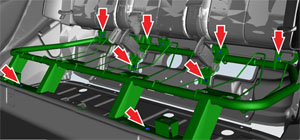
- Remove all clips that secure cables to the 2nd row seat frame. Ensure that all cables are reattached to the seat frame upon reinstallation. Caution: Do not damage any cables. Caution: Protect the surrounding interior trim before removing the 2nd row seat frame in the next step. Caution: When removing the 2nd row seat frame in the next step, do not permit the seat belt buckles to catch on the HV cables.
- Lift up on the front end of the frame to release it from the body. Caution: Do not allow the seat belt buckles to catch on the HV cables. Caution: Do not damage any of the surrounding trim.
- Remove the seat frame from the vehicle.
READ NEXT:
 Frame - Seat Base - 2nd Row - Executive (Remove and Replace)
Removal
Remove the 2nd row back rest assembly (refer to procedure).
Dual Motor vehicles only: Release the fasteners
(x4) that secure the inline fuse bracket to the seat frame (torque
Frame - Seat Back - 2nd Row Seat - LH (Remove and Replace)
Removal
Remove Rear LH seat back rest assembly and remove Pivot lock
from outboard side of assembly (refer to procedure)
Release and remove latch cover from seat back.
Frame - Seat Back - 2nd Row Seat - RH (Remove and Replace)
Removal
Remove Rear RH seat back rest assembly and remove Pivot lock
from outboard side of assembly (refer to procedure)
Release and remove latch cover from seat back.
SEE MORE:
Harness - Instrument Panel (Remove and Replace)
Removal
Remove the driver's and front passenger's seats (refer to
procedure).
Remove the center console assembly (refer to procedure).
Remove the IP carrier (refer to procedure).
Note: These graphics show a LHD vehicle produced in
mid-2014. Earli
Overview
NOTE: Entertainment options vary by market region.
The touchscreen displays the Entertainment screen when you choose any of the
following apps:
Theater: Play various video
streaming services (such as Netflix, YouTube, Hulu, etc.) while parked.
Arcade: Want to game? Depending
on the game, you ma
© 2019-2026 Copyright www.tesms.org
