Tesla Model S: Assembly - Cover - Footwell - LH (RHD) (Remove and Replace)
Tesla Model S (2012-2026) Service Manual / Instrument Panels and Pedals / Assembly - Cover - Footwell - LH (RHD) (Remove and Replace)
Removal
- Fully open the passenger door.
- Move the passenger seat rearward for access.
- Remove the LH center console closeout extension (refer to procedure).
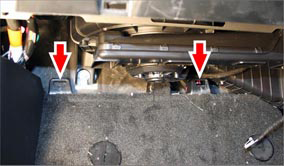
- Release the clips (x4) that secure the lower glove box cover to
the glove box.

- Remove the lower glove box cover.
- Release the clips (x2) that secure the footwell cover to the
dash.
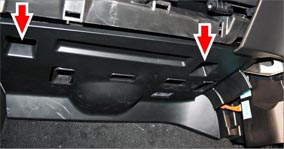
- Disconnect the footwell lamp harness connection.

- Remove the footwell cover.
Installation procedure is the reverse of removal, except for the following: When reinstalling, align the tabs on the footwell cover into the slots (x2) in the footwell bracket cover before securing the clips.
READ NEXT:
 Assembly - Cover - Footwell - RH (RHD) (Remove and Replace)
Removal
Fully open the driver's door.
Move the driver's seat rearward for access.
Remove the RH center console closeout extension (refer to
procedure).
Release the clips (x2)
Rear View Mirror - 1st Generation (Remove and Replace)
Note: This procedure describes how to remove and replace
the 1st generation rear view mirror. If the vehicle is equipped with
a 2nd generation rear view mirror, refer to procedure 15050502 (re
SEE MORE:
Selecting Between Driver Profiles
To adjust Model S based on a
driver's
profile, touch the driver profile icon at the
top of the Controls screen. Then choose
the driver, and Model S is adjusted based
on the settings that have been saved to the
chosen driver profile. See Using Tesla
Profiles to learn more about
saving profil
Latch - Seat Back - 2nd Row Seat - LH (Remove and Replace)
Removal
Remove LH pivot lock (refer to procedure)
Release and remove latch cover from seat back.
Carefully release cover from seat back frame.
Remove bolts (x2) securing latch to seat frame (torque 24 Nm).
R
© 2019-2026 Copyright www.tesms.org
